
🏠 Home > 🗺️ Recipes > 🍞 Breads > 🇲🇲 Myanmar Breads > 🍞 Htut Thayar Palata (Flaky Burmese Paratha) , Nan Bya (Burmese Tandoor-Style Bread) , Pe Byouk (Burmese Boiled Peas)
🍞 Golden Layers and Fluffy Pockets: Unlocking the Secrets of Classic Myanmar (Burmese) Bread Recipes
Published by Supakorn | Updated: February 2026
Introduction: The Heart and Soul of Burmese Street Food
Hey there, fellow food adventurer! If you've ever wandered the bustling streets of Yangon or Mandalay, you’ll know that the aroma of freshly cooked bread is absolutely intoxicating. From the buttery, layered flatbreads flipped with masterful skill to the smoky, fluffy disks pulled from a traditional oven, Myanmar's bread scene is a hidden culinary gem that deserves to be on the world stage. It’s more than just a carb; it's a staple, a snack, a side, and a canvas for a thousand delicious flavors.
While Indian and Thai cuisine often dominate the Southeast Asian spotlight, Burmese food, with its beautiful blend of regional influences, is slowly but surely gaining an international following. And when it comes to bread, Myanmar offers some truly unique variations that are surprisingly easy to recreate in your home kitchen. Forget your sourdough starter for a moment, we're diving into something much simpler and infinitely more satisfying.
In this ultimate long-form, SEO-friendly guide, we’re not just giving you one recipe—we're sharing the secrets to making three of the most popular and authentic classic Myanmar breads. We've focused on recipes that are not only delicious but also feature the long-tail SEO keywords you need to get found by people specifically searching for these culinary treasures.
Get ready to master:
1.Htut Thayar Palata (Flaky Burmese Paratha)
2.Nan Bya (The Chewy, Tandoor-Style Flatbread)
3.Pe Byouk with Aloo Hin (Simple Boiled Peas with a Classic Potato Curry, often served with Palata or Nan Bya, giving you a complete Burmese breakfast/snack experience!)
So, roll up your sleeves, grab your flour, and let's get kneading!
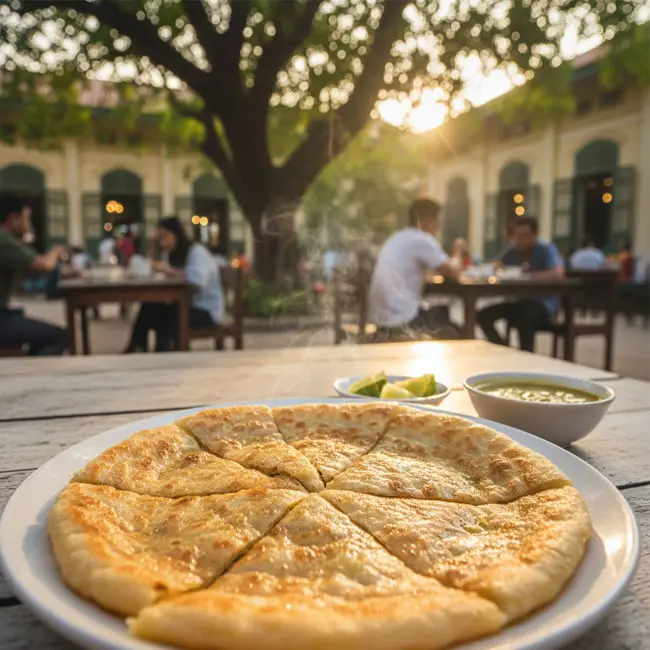
🔹 Recipe 1: Htut Thayar Palata (Flaky Burmese Paratha)
This is the king of Burmese flatbreads. Often mistaken for Indian Paratha or Malaysian Roti Canai, the Htut Thayar Palata (pronounced similar to Pah-lahtah) is unique for its preparation, which gives it those signature paper-thin layers and a delightfully buttery flavor. It's often served plain with a side of sugar, or with a savory curry like Pe Byouk (boiled peas).
About this Recipe: The Street Corner Star
Walk past any tea shop in Myanmar in the morning, and you’ll likely see a street vendor expertly slapping and stretching this dough until it’s almost transparent before folding it into a neat square and frying it on a flat griddle. The process might look like magic, but the secret lies in two things: a well-rested, oil-enriched dough, and the unique folding technique. This recipe focuses on an easier folding method that still delivers those irresistible flaky layers. It’s rich, tender, and the perfect tear-and-dip bread.
Ingredients & Measurements (Makes 8 Palata)
Ingredient - Measurement - Notes
- All-Purpose Flour 400g (about 3 cups) The base of your bread.
- Salt 1 teaspoon Balances the sweetness and richness.
- Granulated Sugar 1 tablespoon Helps with browning and texture.
- Melted Butter or Ghee 3 tablespoons (for the dough) Adds richness and tenderness.
- Water (Warm) 1 cup (about 240ml) You may need slightly more or less.
- Peanut or Vegetable Oil As needed For greasing and frying.
Step-by-Step Instructions
1.Make the Dough: In a large bowl, whisk together the flour, salt, and sugar. Pour in the melted butter/ghee. Gradually add the warm water, mixing until a sticky dough forms.
2.Knead and Rest (Crucial Step!): Turn the dough out onto a lightly oiled (not floured!) surface. Knead vigorously for 10-15 minutes. This develops the gluten, making it elastic enough to stretch thin later. The dough should be soft, smooth, and very pliable.
3.Oil and Rest Again: Divide the dough into 8 equal balls. Lightly coat each ball generously with oil, place them on a tray, cover tightly with plastic wrap, and let them rest at room temperature for at least 2 hours, or up to 4 hours. This long rest is the key to stretchable dough.
4.Stretch and Layer: On a well-oiled surface (again, no flour!), take one dough ball. Gently flatten it with your palm, then carefully begin stretching it outwards with your hands until it’s a very thin, almost translucent circle.
5.The Fold (Creating Layers): Brush the entire surface of the stretched dough with a little extra oil. Fold the left side one-third of the way in, then fold the right side over the top, creating a long rectangle. Stretch this rectangle gently, then coil it tightly from one end to the other (like a snail). Flatten this coil with your palm.
6.Final Roll: Gently roll the coiled dough out with a rolling pin into a 6-inch disc (be careful not to press too hard and ruin the layers).
7.Cook: Heat a non-stick pan or griddle over medium heat. Fry the Palata in a little oil, pressing gently, until golden brown and flaky on both sides. Serve immediately.
Tips & Mistakes to Avoid
- Mistake: Using too much flour during kneading or stretching. Tip: This is an oil-based flatbread, not a flour-based one. Use oil (peanut is traditional) for lubrication to keep the dough from sticking.
- Tip: If your dough tears when stretching, it needs to rest longer. Gluten relaxation is everything for Palata.
- Tip: For maximum flakiness, give the Palata a light "scrunch" from the sides with tongs immediately after taking it off the heat. This helps separate the internal layers.
FAQ
Q: Can I use whole wheat flour?
A: You can, but it will result in a tougher, less flaky Palata. All-purpose flour is best for achieving the traditional texture.
Q: How do I serve Palata?
A: Most commonly, it's served with a sprinkle of white sugar (for a sweet treat) or with a savory curry like Pe Byouk (see Recipe 3) or a mutton curry.
Summary
Htut Thayar Palata is a glorious, layered flatbread that showcases the Indian influence on Burmese cuisine. It’s perfect for a sweet breakfast or as an accompaniment to a savory meal. Master the long rest and the oil-stretching, and you’ll be flipping like a pro!
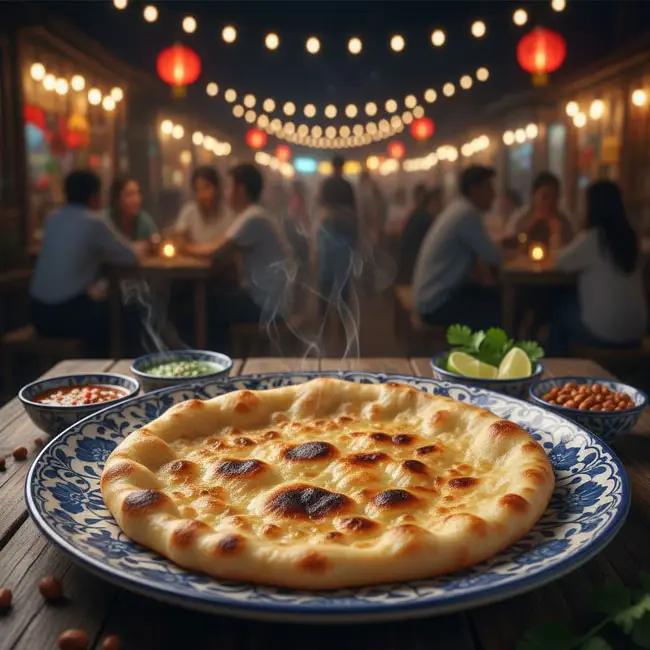
🔹 Recipe 2: Nan Bya (Burmese Tandoor-Style Bread)
If Palata is the layered fry-bread, then Nan Bya is the fluffy, chewy, yeast-leavened alternative. It's Myanmar's version of Naan, but often softer and lighter, served alongside a big bowl of soup or curry. While traditionally cooked in a clay tandoor oven, we'll use a home-friendly method that still gives you that wonderful, slightly charred chewiness.
About this Recipe: The Perfect Scoop
Nan Bya is a quintessential side for any substantial Burmese meal, whether it’s a spicy chicken curry (Sikhyet Hin) or a hearty mutton stew. Its soft, pillowy texture and slight fermentation tang make it ideal for soaking up rich gravies. This is a yeast-risen dough, making it fundamentally different from the unleavened Palata. It’s less about flakiness and more about that soft puff and chew—the perfect vehicle for a flavorful scoop.
Ingredients & Measurements (Makes 6 Large Nan Bya)
Ingredient - Measurement - Notes
- All-Purpose Flour 3 cups (about 380g) Alternatively, use 2:1 ratio of all-purpose to bread flour.
- Instant Dry Yeast 2 teaspoons Speeds up the rising process.
- Sugar 1 tablespoon Feeds the yeast.
- Salt 1 teaspoon For flavor and to control the yeast.
- Plain Yogurt (full-fat) 1/2 cup (120g) The secret to soft, chewy naan.
- Warm Water 3/4 cup (180ml) Should be about 105°F-115°F (40°C-46°C).
- Oil/Melted Butter 2 tablespoons (for the dough) + extra for brushing Adds moisture and flavor.
Step-by-Step Instructions
1.Activate the Yeast: In a large bowl, mix the warm water and sugar. Sprinkle the yeast over the top and let it sit for 5-10 minutes until it becomes foamy and frothy. This proves the yeast is alive.
2.Mix the Dough: Add the flour, salt, yogurt, and 2 tablespoons of oil/butter to the yeast mixture. Mix until a shaggy dough forms.
3.Knead: Turn the dough out onto a lightly floured surface and knead for 5-7 minutes until it's smooth and elastic. It should be slightly sticky but manageable.
4.First Rise: Place the dough ball in a lightly oiled bowl, turning to coat. Cover with plastic wrap and let it rise in a warm spot for 1 to 1.5 hours, or until it has doubled in size.
5.Divide and Shape: Gently punch the dough down to release the air. Divide it into 6 equal pieces and roll each into a smooth ball. Cover the balls and let them rest for another 15 minutes.
6.Roll and Cook: Preheat a heavy-bottomed skillet or cast iron pan over medium-high to high heat (get it HOT). Roll out one dough ball into an oval or circle, about 1/4 inch thick.
7.The Puff: Place the Nan Bya onto the dry, hot pan. Cook for 1-2 minutes until you see large bubbles forming on the surface. Flip it and cook the second side until it has nice brown, slightly charred spots, pressing gently with a spatula.
8.Finish: Immediately brush the hot Nan Bya with melted butter or ghee.
Tips & Mistakes to Avoid
- Tip: The hotter your pan, the more dramatic the puff and the better the texture. If your pan isn't hot enough, the Nan Bya will dry out before it browns.
- Tip: If you have a gas stove, you can use tongs to hold the cooked Nan Bya briefly over an open flame for 5-10 seconds per side after cooking in the pan. This gives it that authentic, smoky, tandoor-charred flavor.
- Mistake: Rolling the Nan Bya too thin. Tip: Unlike Palata, Nan Bya needs to be at least 1/4 inch thick to ensure it puffs up and remains soft in the center.
FAQ
Q: Can I skip the yogurt?
A: You can, but the yogurt adds acidity, which tenderizes the dough, making the Nan Bya softer and chewier. If you must skip it, add a splash of milk and a teaspoon of lemon juice instead.
Q: How do I store leftovers?
A: Wrap cooled Nan Bya tightly in foil and reheat in a warm oven or a skillet until soft again.
Summary
Nan Bya is your soft, fluffy friend for any curry or soup. It’s a rewarding yeast bread to make at home, delivering maximum flavor and texture with minimal fuss.
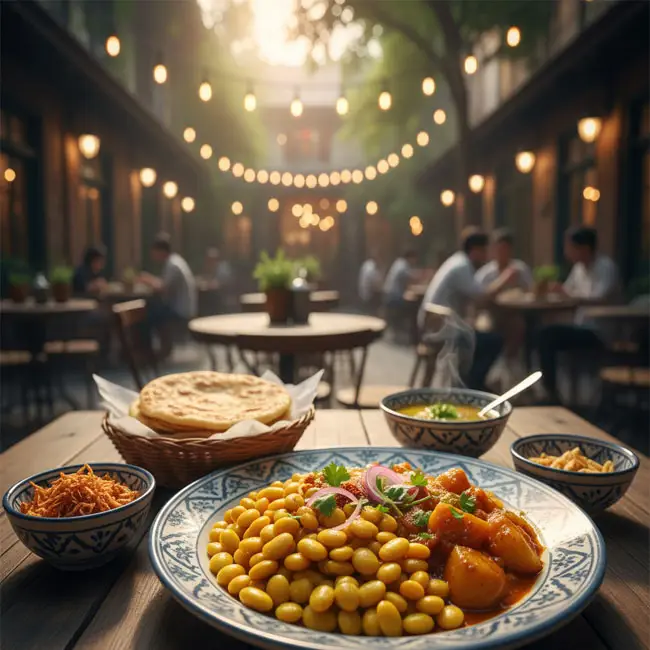
🔹 Recipe 3: Pe Byouk (Burmese Boiled Peas) with Aloo Hin (Potato Curry)
This isn't a bread recipe, but Pe Byouk (often served with a Palata or Nan Bya) is such an integral part of the Burmese breakfast experience that we can’t talk about the breads without it. This simple, comforting dish of boiled peas is the perfect, protein-packed accompaniment, and we’ll pair it with a simple Aloo Hin (Potato Curry) to give you a complete, savory meal.
About this Recipe: The Essential Accompaniment
Pe Byouk literally means "boiled peas," and it typically uses yellow split peas (Pè Byar) or chickpeas (Kala Pe) that are cooked until ultra-tender, seasoned simply with a drizzle of oil, and maybe a little salt. Aloo Hin is the accompanying simple, savory potato curry. The pairing is classic: a flaky Palata or a fluffy Nan Bya, a smear of Pe Byouk, and a dip in the rich, turmeric-stained Aloo Hin. This is the authentic Burmese street food experience on a plate.
Ingredients & Measurements
For the Pe Byouk (Boiled Peas):Ingredient - Measurement - Notes
- Yellow Split Peas or Chickpeas 1 cup (200g) Yellow split peas are most traditional.
- Water 4 cups For soaking and boiling.
- Salt To taste
For the Aloo Hin (Simple Potato Curry):Ingredient - Measurement - Notes
- Potatoes 2 large, peeled and cubed About 400g.
- Onion 1 medium, finely chopped
- Garlic Ginger Paste 1 tablespoon A staple in Burmese cooking.
- Turmeric Powder 1 teaspoon Gives the curry its classic yellow color.
- Chilli Powder 1/2 teaspoon (optional) Adjust to your spice preference.
- Oil 3 tablespoons Any neutral oil, like peanut or vegetable.
- Water 1.5 cups
- Salt To taste
Step-by-Step Instructions
Pe Byouk
1.Soak: Rinse the split peas/chickpeas and soak them in water overnight (or for at least 6 hours).
2.Boil: Drain the soaking water and transfer the peas to a pot. Add 4 cups of fresh water and bring to a boil. Reduce heat, cover, and simmer for 1.5 to 2 hours, or until the peas are soft enough to mash easily with a spoon. You want them to be very tender, not firm.
3.Season: Drain any excess water, if necessary. Mash about half the peas gently to create a creamy texture while leaving the rest whole. Season with salt. Keep warm.
Aloo Hin
1.Sauté the Base: Heat the oil in a pot over medium heat. Add the chopped onion and sauté until golden and softened (about 5-7 minutes).
2.Spice Paste: Add the garlic-ginger paste, turmeric powder, and chili powder (if using). Stir and cook for about 1 minute until fragrant.
3.Cook the Potatoes: Add the cubed potatoes and mix well to coat them with the spice-onion mixture. Add the water and salt.
4.Simmer: Bring the mixture to a boil, then reduce the heat, cover, and simmer for 15-20 minutes, or until the potatoes are tender. You can gently mash a few potato chunks against the side of the pot to naturally thicken the curry. Serve hot.
Tips & Mistakes to Avoid
- Tip: Always soak your peas/chickpeas! This drastically cuts down on cooking time and ensures a beautifully tender result.
- Tip: The Aloo Hin should be slightly soupy, not thick like a stew. It's meant for dipping and soaking into the Palata or Nan Bya.
- Mistake: Not seasoning the Pe Byouk enough. Tip: Pe Byouk is deliberately simple, but it still needs a good pinch of salt to bring out the nutty flavor of the peas.
FAQ
Q: Can I use canned chickpeas?
A: Yes, you can. Rinse them well, and then just simmer them in water for about 20-30 minutes, mashing half of them, to achieve that very soft, boiled texture.
Q: What else can I serve Aloo Hin with?
A: It’s delicious with plain white rice or even just eaten on its own as a light, vegan curry.
Summary
Pe Byouk and Aloo Hin are the comforting, savory anchors of the Burmese bread experience. Simple in ingredients but rich in flavor, they complete the picture of a classic Myanmar breakfast or tea-time snack.
Final Thoughts: Your Burmese Kitchen Adventure Awaits
See? Making authentic Myanmar bread isn't some ancient, forbidden art—it's totally doable! We’ve given you the tools to create two incredible flatbreads, the flaky and buttery Htut Thayar Palata and the soft, chewy Nan Bya, along with the quintessential side dishes, Pe Byouk and Aloo Hin.
The beauty of these recipes is their versatility. You can go sweet with Palata and sugar, or savory with Nan Bya and a hearty curry. Don't be intimidated by the long kneading or resting times; these are the non-negotiables that guarantee a professional result. Think of them as necessary pauses that build flavor and texture.
Ready to impress your friends and family with a truly unique culinary journey? Start with the Palata for a weekend brunch, then move on to the Nan Bya when you're craving some curry comfort. Once you master the dough, the rest is just practice.
Now it's your turn! Which Burmese bread are you going to try first? Share your photos, questions, and your own Burmese flatbread adventures in the comments below! We can’t wait to hear how your long-form SEO-friendly foray into the world of Myanmar street food turns out!
| 🇲🇲 🍞 < Back |