
🏠 Home > 🗺️ Recipes > 🥪 Appetizers > 🇫🇲 Micronesia Appetizers > 🥪 1.Coconut Banana Pone Bites , 2.Crispy Taro Patties with Soy Dipping Sauce , 3.Rice Ball Stuffed with Sweet Coconut Onion
🥪 How to Make 3 Authentic Micronesian Appetizers Without Breaking the Bank
Published by Supakorn | Updated: June 2026
🇫🇲 🐟 Intro: Island Flavors That Don’t Cost a Fortune
Micronesian food is having a moment. Travelers coming back from Guam, Pohnpei, Chuuk, and Palau keep raving about the same thing: bold, simple, coconut-forward bites that taste like vacation. On TikTok and food blogs, you’ll see grilled taro, banana fritters, and coconut rice balls popping up next to beach pics and turquoise water. The vibe is real food from real people, not fancy plating.
But here’s the best part. You don’t need a plane ticket or a $30 grocery haul to try it. The traditional cooking across Micronesia leans heavily on root crops, banana, coconut, and a little seasoning. That means it’s naturally budget-friendly. If you’ve got 5 dollars and a stove, you’re in business.
I pulled together 3 of the most popular street-snack-style appetizers you’ll find across the Micronesian islands. They’re cheap, fast, and actually taste like what you’d get from a roadside stand in Kolonia or a family BBQ in Hagåtña.
Here’s what we’re making today:
🍙 ◦ Recipe 1: Coconut Banana Pone Bites
🍣 ◦ Recipe 2: Crispy Taro Patties with Soy Dipping Sauce
🥙 ◦ Recipe 3: Rice Ball Stuffed with Sweet Coconut Onion
Every recipe stays under the 5 dollar total budget if you shop smart. I’ll break down each one with measurements, steps, and all the “oops, don’t do that” tips I learned the hard way. Ready? Let’s get your kitchen smelling like the islands.
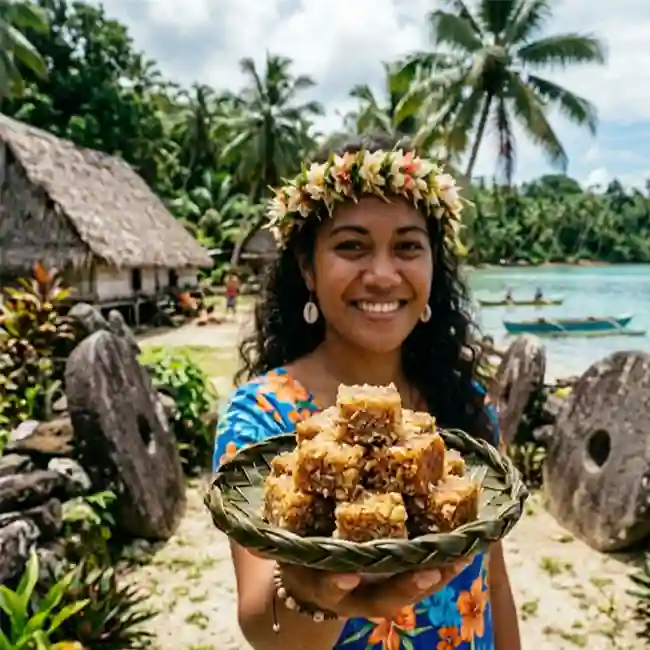
🍌 Recipe 1: Coconut Banana Pone Bites
🥥 About this Recipe
Pone is Micronesia’s answer to comfort food. Think warm, chewy, banana bread meets coconut pudding, but way easier. In Pohnpei they bake it in big trays for parties. We’re scaling it down to bite-size appetizers you can pop like snacks. It’s naturally dairy-free, super filling, and the smell alone will have people walking into your kitchen asking what you’re cooking. Total cost for a batch of 12-15 bites: about 1.60.
📝 Ingredients & Measurements
◦ Ripe bananas, mashed: 2 medium bananas or about 1 cup mashed
◦ Fresh grated coconut or unsweetened shredded coconut: 1/2 cup
◦ All-purpose flour: 1/3 cup
◦ Brown sugar or white sugar: 2 tablespoons
◦ Baking powder: 1/2 teaspoon
◦ Salt: 1 pinch
◦ Water or coconut milk: 3 tablespoons, add more if batter looks too thick
◦ Cooking oil or coconut oil for greasing: 1 teaspoon
👩🍳 Step-by-Step Instructions
1.Preheat and prep: Set your oven to 350 degrees Fahrenheit ( 176 degrees Celsius ). Lightly grease a mini muffin tin or line a baking sheet with parchment. Mini muffin tins make perfect one-bite pieces.
2.Mash and mix wet: In a bowl, mash the bananas until mostly smooth. A few small lumps are fine. Stir in the coconut, sugar, and water or coconut milk.
3.Add dry ingredients: Sprinkle flour, baking powder, and salt over the banana mix. Fold everything together until you get a thick, sticky batter. It should drop slowly from a spoon, not runny.
4.Scoop and bake: Drop 1 tablespoon of batter per bite into your tin or onto the sheet. Flatten the tops lightly with the back of a spoon.
5.Bake until set: Bake for 18 to 22 minutes. Edges should look golden and the centers should spring back when you tap them.
6.Cool before eating: Let them sit 5 minutes. They firm up as they cool and the coconut flavor gets stronger. Serve warm or room temp.
⚠️ Tips & Mistakes to Avoid
◦ Don’t use green bananas: They won’t be sweet enough and the texture goes gummy. The spottier the banana, the better your pone tastes.
◦ Avoid thin batter: If it looks like pancake mix, add 1 extra tablespoon of flour. Runny batter = flat, sad bites that don’t hold shape.
◦ Don’t skip greasing the pan: This stuff loves to stick. Even with non-stick pans, a little oil saves you from chiseling pone out later.
◦ Watch your bake time: Overbake by 3 minutes and they go from chewy to hockey pucks. Pull them when the edges are golden, not brown.
◦ Shredded coconut vs fresh: If you only have sweetened shredded coconut, cut the sugar to 1 tablespoon. Otherwise it’s dessert-level sweet.
❓ FAQ
Q1.Can I make this without an oven?
Yes. Heat a non-stick pan on low, drop spoonfuls in, cover with a lid, and cook 4 minutes per side. They’ll be flatter but still delicious.
Q2.How long do they keep?
2 days in an airtight container on the counter, or 5 days in the fridge. They taste amazing toasted for 3 minutes the next day.
Q3.Can I freeze them?
Totally. Freeze in a single layer, then bag them. Reheat in the oven at 300 degrees Fahrenheit / 148 degrees Celsius for 8 minutes. Microwaving works but makes them softer.
✅ Summary
Coconut Banana Pone Bites give you that classic Micronesian banana-coconut flavor in a cheap, poppable form. Under 20 minutes of work, pantry ingredients, and you get 12+ snacks for less than 2 dollars. If you’re new to island cooking, start here.

🥔 Recipe 2: Crispy Taro Patties with Soy Dipping Sauce
🌊 About this Recipe
Taro is the backbone of Micronesian cooking. In Chuuk and Yap, you’ll see it boiled, grilled, or pounded. This version turns it into crispy, savory patties that taste like a cross between a hash brown and a fritter. We’re keeping it simple with just taro, onion, and seasoning, then serving with a 2-ingredient soy dip that locals love. This recipe costs about 1.70 for 10 small patties.
📝 Ingredients & Measurements
For the patties:
◦ Taro root, peeled and grated: 2 cups, about 1 small taro
◦ Yellow onion, finely minced: 1/4 cup
◦ All-purpose flour: 2 tablespoons
◦ Salt: 1/2 teaspoon
◦ Black pepper: 1/4 teaspoon
◦ Garlic powder: 1/4 teaspoon, optional but recommended
◦ Cooking oil for pan frying: 3 tablespoons
For the quick soy dip:
◦ Soy sauce: 2 tablespoons
◦ Rice vinegar or white vinegar: 1 teaspoon
◦ Sugar: 1/2 teaspoon
◦ Chili flakes: 1 pinch, optional
👩🍳 Step-by-Step Instructions
1.Prep the taro safely: Wear gloves if your skin is sensitive. Raw taro can make hands itchy. Peel it, rinse it, then grate it using the large holes of a box grater.
2.Drain excess water: Place grated taro in a clean kitchen towel and squeeze hard over the sink. You want it damp, not wet. Too much water = soggy patties.
3.Mix the patty dough: In a bowl, combine drained taro, minced onion, flour, salt, pepper, and garlic powder. Mix with your hands. It should stick together when you press it. If it’s crumbly, add 1 teaspoon water.
4.Shape the patties: Scoop 2 tablespoons of mix and flatten into a 2-inch wide, 1/2-inch thick patty. Don’t make them too thick or the center won’t cook.
5.Pan fry until golden: Heat oil in a skillet over medium heat. Fry patties 3 to 4 minutes per side until deep golden and crisp. Don’t crowd the pan. Do it in batches.
6.Make the dip: While patties drain on paper towels, stir soy sauce, vinegar, sugar, and chili flakes in a small bowl until sugar dissolves.
7.Serve hot: These are best straight from the pan when the outside is still crackling. Dip and eat.
⚠️ Tips & Mistakes to Avoid
◦ Never eat raw taro: It must be cooked. Raw taro has compounds that irritate your throat. Frying takes care of it, so don’t sneak a taste of the raw mix.
◦ Grate, don’t mash: Mashed taro makes gluey patties. Grating keeps it light and crispy.
◦ Oil temperature matters: If the oil isn’t hot enough, patties soak it up and go greasy. Test with a tiny piece. It should sizzle immediately.
◦ Don’t skip squeezing the taro: I’ve ruined a whole batch by being lazy here. Wet taro = patties that fall apart in the pan.
◦ Keep them small: Big patties look impressive but the middle stays raw while the outside burns. 2-inch size is the sweet spot.
❓ FAQ
Q1.I can’t find taro. What can I use?
Potato works in a pinch, but the flavor is different. Japanese sweet potato is the closest match in texture. If you use potato, add 1 extra tablespoon flour.
Q2.Can I bake these instead of frying?
Yes. Brush with oil and bake at 400 degrees Fahrenheit ( 204 degrees Celsius ) for 20 minutes, flipping halfway. They won’t be as crispy but still good.
Q3.Why are my hands itchy after peeling taro?
Raw taro has calcium oxalate crystals. Use gloves next time. Wash hands with soap and vinegar if it happens. It stops in 30 minutes.
✅ Summary
These Crispy Taro Patties are salty, crunchy, and ridiculously cheap. The soy dip adds that umami hit you get at Micronesian cookouts. Make a double batch because they disappear fast. Total hands-on time: 25 minutes.
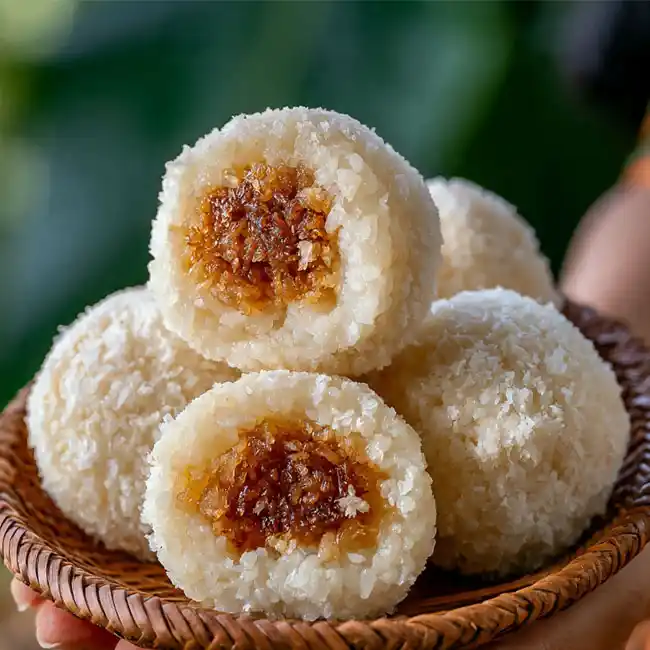
🍙 Recipe 3: Rice Ball Stuffed with Sweet Coconut Onion
🌺 About this Recipe
Rice balls show up all over Micronesia, especially in Guam and Palau where Japanese influence is strong. This version is stuffed with a sweet, savory coconut and onion mix that tastes like something your Micronesian aunty would sneak you from the kitchen. They’re soft, filling, and use plain white rice to stretch your budget. One batch makes 8 rice balls for about 1.65.
📝 Ingredients & Measurements
For the rice:
◦ Short grain or medium grain white rice: 1 cup, uncooked
◦ Water: 1 and 1/4 cups
◦ Salt: 1/2 teaspoon
For the filling:
◦ Yellow onion, finely diced: 1/2 cup
◦ Shredded coconut, unsweetened: 1/4 cup
◦ Soy sauce: 1 tablespoon
◦ Brown sugar: 1 teaspoon
◦ Cooking oil: 1 teaspoon
For assembly:
◦ Salt for your hands: 1 pinch
◦ Water for your hands: small bowl
👩🍳 Step-by-Step Instructions
1.Cook the rice: Rinse rice until water runs mostly clear. Combine rice, water, and salt in a pot. Bring to boil, then cover and reduce to low for 15 minutes. Turn off heat, let sit 10 minutes. Don’t peek.
2.Make the filling: Heat oil in a small pan over medium. Add onion and cook 5 minutes until soft. Add coconut, soy sauce, and sugar. Stir 2 minutes until it looks toasty and smells sweet-savory. Set aside to cool.
3.Prep your hands: Wet your hands with water and rub a tiny bit of salt on your palms. This keeps rice from sticking and seasons it lightly.
4.Shape and stuff: Grab about 1/4 cup warm rice. Flatten it in your palm. Put 1 teaspoon of filling in the center. Fold rice around it and gently shape into a ball or triangle. Don’t squeeze too hard.
5.Repeat: You should get 8 balls. If the rice cools and gets crumbly, microwave it 20 seconds with a damp paper towel.
6.Optional toast: For extra flavor, sear the rice balls in a dry non-stick pan 1 minute per side until lightly crisp.
⚠️ Tips & Mistakes to Avoid
◦ Don’t use cold rice: Cold rice from the fridge won’t stick together. Always use fresh warm rice, or reheat it until steaming.
◦ Avoid overfilling: 1 teaspoon filling is enough. Too much and the ball bursts when you shape it.
◦ Long grain rice is risky: It doesn’t have enough starch to hold shape. If that’s all you have, add 1 teaspoon mashed potato to the rice to help it bind.
◦ Don’t skip salting your hands: It sounds weird but it seasons the outside and prevents sticking. Plain water alone isn’t enough.
◦ Let the filling cool: Hot filling makes the rice gummy and hard to shape. Room temp is perfect.
❓ FAQ
Q1.Can I use leftover rice?
Yes, but sprinkle 1 tablespoon water over it and microwave covered until hot and steamy. Then proceed. Dry rice won’t form balls.
Q2.What if I hate onion?
Swap it for finely diced green cabbage or carrot. Cook it the same way. The goal is something soft and a little sweet with the coconut.
Q3.How do I store them?
Wrap each one in plastic wrap. Fridge for 3 days. Microwave 30 seconds to reheat. They don’t freeze well, the texture goes weird.
✅ Summary
These stuffed rice balls are the ultimate budget comfort food. Soft rice, sweet-savory coconut center, and you can eat them with your hands. Perfect for lunchboxes or a party tray. Total cost per ball: about 20 cents.
💭 Final Thoughts: You’ve Got This
Look, cooking Micronesian food at home isn’t hard. It’s not about fancy tools or expensive imports. The islands have been making incredible food from taro, banana, rice, and coconut for generations because that’s what was available and affordable.
All 3 recipes together cost about 4.95 total if you buy store-brand ingredients. That’s cheaper than one appetizer at most restaurants. And you get 30+ pieces of real, homemade island snacks.
My advice? Don’t try all 3 in one day unless you’re feeding a crowd. Pick one this weekend. The Banana Pone Bites are the easiest entry point. Once you see how simple it is, the taro and rice balls won’t intimidate you.
Then come back and tell me which one you made. Did your family crush the whole batch of taro patties? Did the rice balls survive until the next day? I want to hear.
Micronesian cooking is meant to be shared. So cook cheap, eat well, and pass a plate to someone. That’s the island way.
| 🇫🇲 🥪 < Back |