
🏠 Home > 🗺️ Recipes > 🍱 Snacks > 🇲🇽 Mexico Snacks > 🍱 1.Salsa Roja con Tostadas (Roasted Red Salsa with Crispy Tortillas), 2.Quesadillas Fritas (Crispy Fried Cheese Turnovers) , 3.Tostilocos (The Crazy Snack Mix)
🍱 Sharing the Zest: Essential Mexican Snacks for Your Next Gathering
Published by Supakorn | Updated: February 2026
Hey everyone! Ready to talk about one of the best parts of any culture? Snacks!
Mexican cuisine is famous worldwide for its hearty meals, but let’s be real, the snacks—or antojitos (little cravings)—are where the real fun is at. They are perfectly sized, packed with flavor, and absolutely ideal for sharing. Whether you’re hosting a big game night, having a casual afternoon gathering with neighbors, or just looking for a fun way to feed your family, Mexican snacks are always the answer. They bring the party!
Internationally, people are constantly looking for authentic, easy, and satisfying appetizers that move beyond the usual chips and dip. Mexican snacks fit that bill perfectly—they are often inexpensive to make, use fresh, bright ingredients, and can be customized to suit any palate, from mild to seriously spicy.
This article is your new go-to guide for transforming simple ingredients into show-stopping, shareable Mexican treats. We are diving into three of the most popular and universally loved recipes that are easy to recreate in your home kitchen.
Get ready to heat up the kitchen with these three amazing recipes:
📝 1.Salsa Roja con Tostadas (Roasted Red Salsa with Crispy Tortillas): The ultimate foundation of Mexican snacking.
📝 2.Quesadillas Fritas (Fried Cheese Turnovers): Crispy, cheesy pockets of pure comfort.
📝 3.Tostilocos (The Crazy Snack Mix): A customizable, wild, and incredibly fun street food favorite.
Let's dive into these recipes and make your next gathering a flavorful success!

🌶️ Recipe 1: Salsa Roja con Tostadas (Roasted Red Salsa with Crispy Tortillas)
If there is one snack that is the heart of Mexican cuisine, it's Salsa Roja (Red Sauce). Forget those jarred, watery versions you find in the supermarket. Authentic, homemade salsa roja is smoky, robust, and has a complex depth of flavor achieved by roasting the ingredients. Serving it fresh with crispy tostadas (or even thick-cut tortilla chips) is the ultimate, shareable appetizer. It's simple, but the roasting step makes all the difference!
⭐ About this Recipe
This salsa is rustic and foundational. Unlike fresh Pico de Gallo, which is raw and chunky, Salsa Roja is cooked, blended, and often has a slightly smoky char. The key ingredients are tomatoes, chili peppers (usually jalapeño or serrano), onion, and garlic. Roasting these vegetables—either on a comal (griddle), in a skillet, or under a broiler—caramelizes their sugars and softens their texture, resulting in a rich, deeply flavored sauce that’s fantastic for dipping and topping almost anything.
📜 Ingredients & Measurements
You'll need just a handful of fresh ingredients, plus your favorite tortilla chips or homemade tostadas.
For the Roasted Salsa Roja:
• 1 pound Roma tomatoes (about 4-5 medium tomatoes)
• 2 Jalapeño peppers (use 1 for mild, 3 for spicy)
• 1/4 medium White onion, roughly chopped
• 2 cloves Garlic, unpeeled
• 1/2 cup Fresh cilantro, chopped
• 1 teaspoon Salt (or to taste)
• 1/4 teaspoon Cumin powder
• 1 tablespoon Freshly squeezed lime juice
For Serving:
• 1 package Tostadas (pre-made crispy corn tortillas) or high-quality tortilla chips
🔥 Step-by-Step Instructions
1.Roast the Vegetables: Heat a comal or a heavy-bottomed cast iron skillet over medium-high heat (no oil needed!). Place the whole tomatoes, jalapeño peppers, and unpeeled garlic cloves on the hot surface.
2.Char: Turn the vegetables every 3-5 minutes. The tomatoes should blister, soften, and blacken in spots. The chiles should soften and look slightly charred. The garlic skins should blacken. This process usually takes 10-15 minutes.
3.Cool and Peel: Once roasted, let the ingredients cool slightly. Peel the skin off the garlic cloves (they should slip out easily).
4.Blend the Base: Place the roasted tomatoes, jalapeños, and peeled garlic into a blender. Add the chopped raw onion, salt, cumin, and lime juice.
5.Achieve Texture: Pulse the mixture a few times until you reach your desired consistency. Most Salsas Rojas are slightly chunky, not perfectly smooth. Do not over-blend!
6.Finish and Serve: Pour the salsa into a bowl. Stir in the chopped cilantro. Taste and adjust the salt or lime if needed. Serve immediately or chill for a richer flavor. Serve with crispy tostadas for dipping!
💡 Tips & Mistakes to Avoid
• Tip: The Smoke is the Star. Don't be afraid of the black, charred spots on the tomatoes and chiles! That smoky char is where the authentic flavor comes from.
• Mistake: Removing Chili Seeds Too Soon. Only remove the seeds and veins from the jalapeños after roasting if you want less heat. Roasting them whole captures the flavor best.
• Tip: Use a Broiler. If you don't have a skillet, place the vegetables on a baking sheet and broil on high until charred, turning once. This is a great shortcut!
• Mistake: Blending Until Smooth. A true rustic salsa has texture. Blending for too long releases air and makes the salsa foamy and less flavorful. Use short pulses!
❓ FAQ
Q: How spicy is this salsa?
A: The heat level depends on the jalapeños! Start with 1 jalapeño for a mild, flavorful salsa. Remember that most of the heat is concentrated in the seeds and veins, so remove them if you prefer a milder taste.
Q: How long does homemade salsa last?
A: Properly stored in an airtight container in the refrigerator, this roasted salsa is best consumed within 5–7 days. The flavor will deepen over the first day.
📝 Summary
Salsa Roja con Tostadas is a simple but incredibly rewarding snack. The deep, smoky flavor achieved through roasting the vegetables is incomparable. Serving this authentic salsa with crunchy tostadas is the perfect, customizable, and shareable treat for friends and family—the ultimate way to start any Mexican gathering.

🧀 Recipe 2: Quesadillas Fritas (Crispy Fried Cheese Turnovers)
Move over, flat-grilled quesadillas! Quesadillas Fritas—or fried quesadillas—are next level. These are crispy, half-moon-shaped turnovers traditionally filled with cheese and occasionally other ingredients, then deep-fried until the exterior is golden brown and bubbly, and the cheese inside is perfectly molten. They are pure comfort food and a delicious, portable snack perfect for sharing.
🥟 About this Recipe
Unlike the common flour-tortilla quesadilla, the traditional Mexican version often uses fresh corn masa to form a pocket, or they use fresh corn tortillas that are folded and sealed before frying. This gives them an amazing, chewy-crispy texture. The filling is usually a simple, excellent melting cheese like Oaxaca or Asadero. They are served immediately, piping hot, usually topped with creamy salsa and a sprinkle of cotija cheese. They are handheld, fun, and utterly addictive!
📜 Ingredients & Measurements
We're going to use corn tortillas to simplify the process, focusing on that perfect crispy exterior!
For the Quesadillas:
• 12 Corn tortillas (fresh and pliable is best)
• 1 cup Oaxacan cheese or Monterey Jack cheese, shredded (must be a good melting cheese)
• 1/4 cup Finely chopped white onion (optional, but recommended for flavor)
• 1/4 cup Chopped fresh cilantro (optional)
• 3 cups Vegetable oil, for frying
For Topping (Optional but essential for authentic flavor):
• 1/2 cup Mexican Crema (or sour cream thinned with a little milk)
• 1/4 cup Crumbled Cotija cheese
• Your favorite Salsa Verde or Salsa Roja
🔪 Step-by-Step Instructions
1.Prep the Filling: In a small bowl, gently toss the shredded cheese with the chopped onion and cilantro (if using).
2.Heat the Oil: Pour the vegetable oil into a deep skillet or pot (at least 2 inches deep). Heat the oil over medium-high heat until it reaches 350°F ( 175°C). If you don't have a thermometer, a drop of water should sizzle immediately.
3.Prepare the Tortillas: If your tortillas are stiff, briefly warm them in a damp paper towel in the microwave for 15-20 seconds to make them pliable and prevent cracking when folded.
4.Fill and Seal: Place a corn tortilla on a flat surface. Spoon about 2 tablespoons of the cheese mixture onto one half of the tortilla. Moisten the edges of the tortilla lightly with water. Fold the other half of the tortilla over the filling to form a half-moon shape. Press the edges firmly to seal. You can use a fork to crimp the edges tightly shut—this is key to preventing cheese from escaping!
5.Fry: Carefully place 2-3 filled quesadillas into the hot oil (do not overcrowd the pan!). Fry for 1-2 minutes per side, turning with tongs, until they are golden brown and crispy.
6.Drain and Serve: Remove the fried quesadillas and place them on a plate lined with paper towels to drain excess oil. Serve immediately! Top with a drizzle of Mexican Crema, a sprinkle of cotija cheese, and a spoonful of salsa.
💡 Tips & Mistakes to Avoid
• Tip: The Cheese Matters. Use a low-moisture, good melting cheese like Oaxacan, Asadero, or Monterey Jack. High-moisture cheeses (like fresh mozzarella) can steam inside and make the quesadilla soggy or explode during frying.
• Mistake: Cold Tortillas. Trying to fold cold, dry corn tortillas will cause them to crack and break. Always warm them slightly to make them pliable before folding and sealing.
• Tip: Crimp is Critical. Use a fork to crimp the edges like a pie crust! A tight seal ensures that the delicious, molten cheese stays inside the turnover and doesn't leak into the oil, which lowers the oil temperature and makes everything soggy.
• Mistake: Overfilling. Don't be greedy with the filling! Too much cheese will make sealing impossible and guarantee a cheese explosion.
❓ FAQ
Q: Can I bake or air-fry these instead of frying?
A: Yes, but they won't have the same authentic texture. To air-fry, spray them lightly with oil and cook at 375∘F for about 8-10 minutes, flipping halfway, until golden and crisp.
Q: Can I add meat to the filling?
A: Of course! Traditional options include shredded chicken (tinga), spiced potato, or sautéed mushrooms. Just make sure the filling is fully cooked and drained before adding it to the cheese.
📝 Summary
Quesadillas Fritas are the perfect indulgent, shareable snack. They deliver an incredible crunch on the outside and a burst of molten, savory cheese on the inside. They are handheld, customizable, and when topped with a little crema and salsa, they become an unforgettable crowd-pleaser for any family or friend gathering.
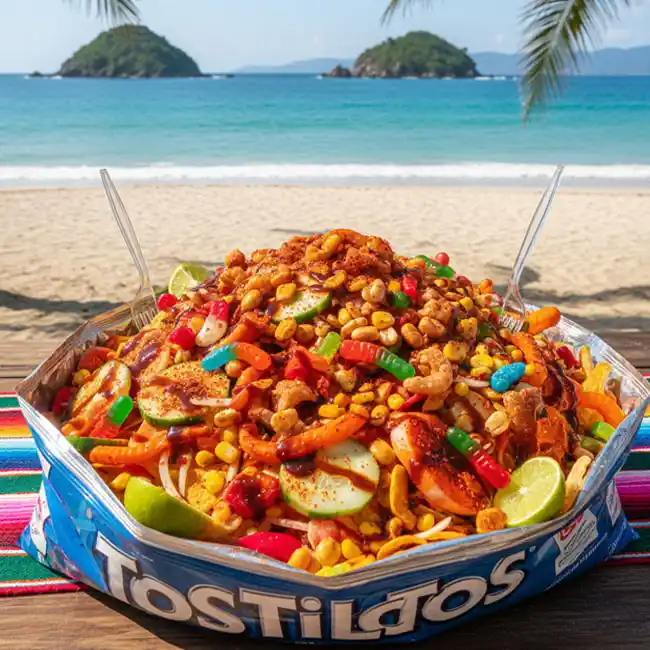
🌈 Recipe 3: Tostilocos (The Crazy Snack Mix)
If you're looking for a snack that is guaranteed to generate smiles, photos, and conversation, you need to make Tostilocos! This wildly popular Mexican street food literally translates to "Crazy Tostitos." It’s an insanely fun and delicious layered snack made inside a bag of Tostitos (or similar corn chips), piled high with a dizzying array of toppings. It's the ultimate communal, DIY, and customizable treat.
🎉 About this Recipe
Tostilocos are a reflection of Mexican street food culture: creative, bold, and packed with contrasting textures and flavors—sweet, salty, savory, spicy, and tangy. The base is usually a bag of chips (often a large bag of Tostitos Salsa Verde), which is sliced open and used as the serving vessel. Toppings generally include Cueritos (pickled pork skin, which we will replace with a vegan/veg option), jicama, cucumber, peanuts, and doused in various sauces and lime juice. It’s an experience more than just a snack!
📜 Ingredients & Measurements
The beauty of Tostilocos is that there are no strict measurements—it’s all about layering!
The Base:
• 1 Large bag of Tostitos Salsa Verde corn chips (or similar large, sturdy corn chip)
The Hearty Toppings (Customize this!):
• 1 cup Chopped jicama (peeled and diced into 1/2-inch cubes)
• 1 cup Chopped cucumber (peeled and diced into 1/2-inch cubes)
• 1/2 cup Chopped peanuts (Japanese-style coated peanuts are traditional)
• 1/2 cup Gummy candies (like small gummy bears or chili-dusted mango candies)
• 1/2 cup Shredded carrots
The Sauces & Seasonings:
• 1 bottle Chamoy sauce (a sweet, tangy, and slightly spicy fruit sauce)
• 1 bottle Hot sauce (like Valentina or Tapatío)
• 4 Limes, cut into wedges
• 1 container Tajín Clásico seasoning (chili, lime, and salt powder)
🔪 Step-by-Step Instructions
1.Prepare the Base: Open the bag of Tostitos by slicing the long side open down the middle. Gently crush the chips just a little bit inside the bag to make room for the toppings.
2.Layer the Hearty Ingredients: Start layering the ingredients right on top of the chips in the bag. Add the diced jicama, diced cucumber, chopped peanuts, shredded carrots, and gummy candies. You can layer them in any order—the goal is maximum surface area!
3.Drench with Sauce: Drizzle a generous amount of Chamoy sauce over all the ingredients. Seriously, don't be shy!
4.Add the Heat: Drizzle with hot sauce to your taste preference. Start with a light drizzle, as you can always add more!
5.Season and Serve: Squeeze the fresh lime juice over the entire mixture. Sprinkle everything generously with Tajín seasoning.
6.Eat! Serve the Tostilocos immediately with forks or chopstick-style tongs. It’s meant to be shared right out of the bag, encouraging everyone to dig in and experience the explosion of textures and flavors!
💡 Tips & Mistakes to Avoid
• Tip: Make a DIY Bar! The most fun way to serve this is by setting up a Tostilocos bar. Lay out all the potential toppings (jicama, cucumber, candies, sauces, etc.) and let everyone slice open their own bag of chips and customize their own Tostiloco!
• Mistake: Too Much Liquid Too Soon. If you let the Tostilocos sit for a long time, the chips will get soggy from the sauces. It's best to assemble and eat right away!
• Tip: The Candy Contrast. The slightly sweet, chewy gummy candies are essential! They provide the necessary unexpected texture and flavor contrast that makes the "crazy" part of Tostilocos work.
• Mistake: Not Cutting Open the Bag. Don't just open the top! Slicing the bag longways turns it into a perfect, deep, edible bowl.
❓ FAQ
Q: Where can I find Chamoy and Tajín?
A: You can find both Chamoy sauce and Tajín seasoning at most Latin American markets, many large supermarkets in the international aisle, or online. They are must-haves for authentic Mexican snacks!
Q: What is a good substitute for jicama?
A: Jicama is a root vegetable with a crisp, slightly sweet texture. If you can't find it, you could substitute it with water chestnuts or firm, peeled apple for a similar satisfying crunch.
📝 Summary
Tostilocos is the ultimate, fun, and crazy Mexican snack for sharing. It’s a sensory experience that combines sweet, sour, salty, and spicy all in one bite. Perfect for parties, this customizable chip-in-a-bag creation is sure to be the most memorable and talked-about snack at your next get-together!
🥳 Final Thoughts
That’s it! You are now fully equipped to ditch the boring appetizers and bring the authentic, vibrant flavor of Mexican street snacks right into your home.
We’ve covered the smoky, essential Salsa Roja, the crispy, cheesy perfection of Quesadillas Fritas, and the wild, customizable fun of Tostilocos. These recipes are not just food; they’re an experience, designed to be shared and enjoyed with the people you love.
Remember, the secret to Mexican cooking is using fresh, bold flavors and having fun with the process. Don’t be afraid to adjust the heat or swap a topping.
I encourage you to try one of these this weekend! Start with the Salsa Roja—it’s the foundation of everything good. Then, invite some friends over and let them build their own Tostilocos!
Which of these three fantastic Mexican snacks will you be making first to share with your family and friends?
| 🇲🇽 🍱 < Back |