
🏠 Home > 🗺️ Recipes > 🍞 Breads > 🇰🇮 Kiribati Breads > 🍞 1.Te Bua Toro Ni Baukin , 2.Te Karekare Rourou , 3.Katati Ni Ben
🍞 3 Must-Try I-Kiribati Breads You Can Make Crispy in 15 Minutes Flat
Published by Supakorn | Updated: June 2026
🇰🇮 🍘🥥 Introduction: Why I-Kiribati Bread Is Having a Moment Worldwide
If you’ve been scrolling food TikTok or YouTube lately, you’ve probably noticed Pacific Island cuisine is blowing up. From Hawaii to Fiji, travelers and home cooks are obsessed with simple, soulful island recipes that use coconut, root starches, and zero fuss. And right in the middle of that wave is Kiribati — a tiny nation of 33 atolls in the central Pacific with bread traditions that are shockingly easy, naturally dairy-free, and ridiculously crispy.
I-Kiribati bread isn’t your fluffy sandwich loaf. Think more like a golden, chewy-crisp flatbread or skillet cake that locals grill over open fire, dip in fresh coconut cream, and eat as a snack or with grilled fish. The best part? You don’t need an oven, a mixer, or even yeast for most versions. If you’ve got flour, coconut, and a pan, you’re 15 minutes away from a taste of the Pacific.
This post pulls together 3 of the most popular I-Kiribati-inspired breads you can make at home. No hard-to-find ingredients. No all-day proofing. Just fast, crispy, crave-worthy results. Let’s get into them:
🥮 • Recipe 1: Te Bua Toro Ni Baukin – Pan-Fried Coconut Flour Cakes
🍪 • Recipe 2: Te Karekare Rourou – Crispy Cassava Coconut Flatbread
🧀 • Recipe 3: Katati Ni Ben – Sweet Banana Bread Skillet Rounds
Grab your frying pan. Let’s bring Kiribati to your kitchen and make your snack time legendary.

🍳 Recipe 1: Te Bua Toro Ni Baukin – Pan-Fried Coconut Flour Cakes
🥥 About this Recipe
Te Bua Toro Ni Baukin translates loosely to “coconut flour ball dropped in oil.” It’s the I-Kiribati answer to a pancake, donut, and flatbread all in one. Traditionally made when fresh coconut is abundant, families mix coconut with just a bit of flour to bind it, then shallow-fry until the outside is golden and lacy-crisp while the inside stays tender and fragrant.
Why you’ll love it: It’s ready in 12 minutes, naturally sweet from coconut, and perfect for dipping in coffee, tea, or extra coconut cream. Plus, it’s a killer way to use up that bag of desiccated coconut in your pantry.
📝 Ingredients & Measurements
This recipe makes 6 small cakes, enough for 2–3 people snacking.
• Fresh grated coconut or unsweetened desiccated coconut: 1 and 1/2 cups, packed
• All-purpose flour or breadfruit flour: 1/3 cup
• Coconut milk, full-fat canned or fresh: 1/2 cup, plus 1 to 2 tablespoons if needed
• Sugar: 2 tablespoons, white or coconut sugar both work
• Salt: 1/4 teaspoon, fine sea salt
• Baking powder: 1/2 teaspoon, for a little lift
• Coconut oil or neutral oil for frying: 3 to 4 tablespoons
👩🍳 Step-by-Step Instructions
1.Mix the dough: In a medium bowl, combine grated coconut, flour, sugar, salt, and baking powder. Stir until evenly mixed. Pour in 1/2 cup coconut milk and stir with a spoon until it forms a thick, sticky batter. If it looks crumbly, add extra coconut milk 1 tablespoon at a time. You want it wet enough to hold together but not runny.
2.Heat the pan: Place a heavy skillet or non-stick pan over medium heat. Add 2 tablespoons of coconut oil and let it get hot until it shimmers.
3.Shape and fry: Scoop 2 tablespoons of batter and drop it into the pan. Gently flatten with the back of a spoon to about 1/2 inch thick. Repeat, leaving space between cakes. Fry 2 to 3 minutes per side until deep golden brown and edges look crispy and lacy.
4.Drain and serve: Transfer to a plate lined with a paper towel. Repeat with remaining batter, adding more oil as needed. Serve hot. They’re best in the first 10 minutes when the edges are still crackling.
💡 Tips & Mistakes to Avoid
• Don’t skip the squeeze test: If using fresh grated coconut, squeeze it in your hands first. Too wet and your cakes will steam instead of crisp. Too dry and they’ll fall apart. It should feel like damp sand.
• Medium heat is magic: High heat burns the coconut before the inside cooks. Low heat makes them oily. If your first cake browns in under 90 seconds, turn it down.
• No flipping too early: Let that crust form. If you try to flip and it’s sticking, it’s not ready. Give it 30 more seconds.
• Eat them fresh: These lose their crisp after 20 minutes. If you must reheat, use a dry skillet for 1 minute per side. Microwaving makes them chewy.
• Flour swap: Can’t find breadfruit flour? All-purpose works great. For gluten-free, use rice flour 1-for-1. Don’t use 100% coconut flour though — it’ll be too crumbly.
❓ FAQ
Q1.Can I bake these instead of frying?
You can, but you’ll lose the signature lacy-crisp edge. If you must, bake at 400 degrees Fahrenheit ( 204 degrees Celsius ) for 12 minutes on parchment, flip once. Brush with coconut oil first.
Q2.Why did mine fall apart in the pan?
Two culprits: batter too dry, or you flipped too soon. Add 1 tablespoon coconut milk next time and wait for a solid golden crust before touching it.
Q3.Is this sweet or savory?
It’s lightly sweet from coconut. Want savory? Skip the sugar, add a pinch of chili flakes, and serve with grilled fish.
✅ Summary
Te Bua Toro Ni Baukin is your 12-minute ticket to crispy coconut heaven. Minimal ingredients, no yeast, and a texture that’s crunchy outside, tender inside. This is I-Kiribati comfort food at its fastest.

🍠 Recipe 2: Te Karekare Rourou – Crispy Cassava Coconut Flatbread
🌊 About this Recipe
Karekare means “to scrape” in Gilbertese, referring to how cassava is traditionally grated by hand. This flatbread is Kiribati’s rustic, chewy-crispy staple. Rourou adds shredded coconut leaves or taro leaves for flavor, but we’ll keep it simple with just cassava and coconut. The starch from cassava gives it an amazing pull-and-tear texture, while pan-frying creates golden crispy spots like a good naan.
No yeast, no waiting. If you’ve only had cassava as fries or cake, this flatbread will blow your mind. It’s naturally gluten-free and goes with literally everything — eggs, curry, or just a swipe of butter.
📝 Ingredients & Measurements
Makes 4 medium flatbreads.
• Frozen grated cassava, thawed: 2 cups, packed. Fresh works too if you can grate it.
• Desiccated coconut, unsweetened: 3/4 cup
• Coconut cream, the thick part from a can: 1/3 cup
• Salt: 1/2 teaspoon
• Sugar: 1 teaspoon, optional, helps with browning
• Coconut oil for frying: 2 to 3 tablespoons
• Water: 1 to 3 tablespoons, only if batter feels too stiff
👩🍳 Step-by-Step Instructions
1.Drain the cassava: If using frozen, thaw completely then squeeze in a clean towel to remove excess water. You want it damp, not dripping. Too much water = gummy bread.
2.Make the dough: In a bowl, mix cassava, desiccated coconut, coconut cream, salt, and sugar. Use your hands to knead for 1 minute. It should come together like soft play-dough. If it cracks when you press it, add water 1 tablespoon at a time.
3.Divide and flatten: Split into 4 balls. Place a ball between two sheets of parchment or plastic wrap. Press with your palm or roll to 1/4 inch thick, about 6 inches wide. Thinner = crispier.
4.Pan-fry: Heat 1/2 tablespoon oil in a skillet on medium-high. Peel off the top parchment, flip the flatbread into the pan, then peel off the second sheet. Cook 3 to 4 minutes until the bottom has dark golden spots. Flip, add a little more oil around the edges, and cook another 3 minutes.
5.Rest briefly: Let it sit 1 minute on a wire rack so steam escapes and it stays crispy. Repeat with remaining dough.
💡 Tips & Mistakes to Avoid
• Squeeze that cassava: This is the #1 make-or-break step. Wet cassava = gluey, pale flatbread that sticks. Dry it well.
• Don’t roll paper-thin: Under 1/8 inch and it’ll turn into a cracker that shatters. Aim for 1/4 inch for crispy-chewy balance.
• Cast iron is king: If you have it, use it. It holds heat and gives you those beautiful charred blisters. Non-stick works but won’t brown as well.
• Don’t crowd the pan: One flatbread at a time means better heat and better crisp.
• Flavor boost: Add 1 minced green onion or 1/2 teaspoon grated ginger to the dough for a savory twist locals love.
❓ FAQ
Q1.Can I use tapioca starch instead of grated cassava?
No, they behave differently. You need the whole grated root for structure. Tapioca starch will just make a gooey mess.
Q2.Where do I buy grated cassava?
Look in the freezer section of Asian, Latin, or African markets. Goya and other brands sell it. It’s labeled “yuca” sometimes.
Q3.Why is mine not crispy?
Three reasons: pan not hot enough, too much moisture in dough, or you covered it while cooking. Keep it uncovered and hot.
✅ Summary
Te Karekare Rourou is chewy, crispy, and wildly satisfying with just 5 ingredients. It’s Kiribati’s answer to a quick flatbread and it’ll replace store-bought wraps once you try it. 15 minutes, start to finish.
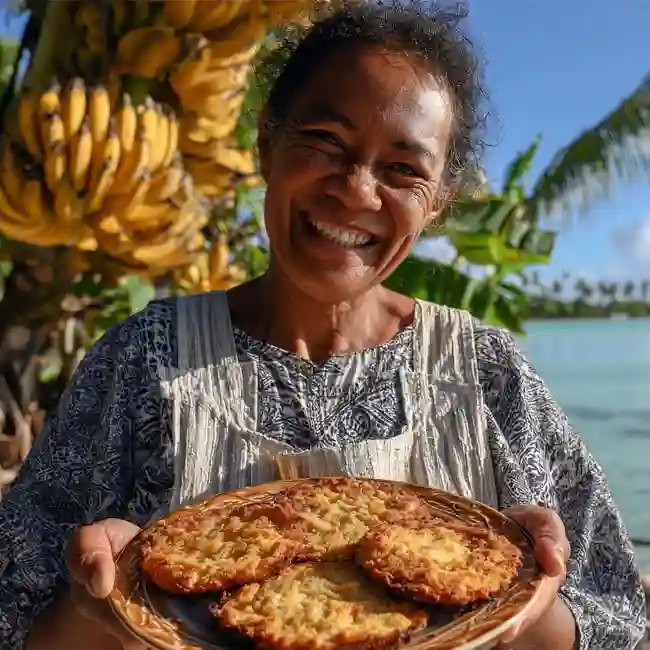
🍌 Recipe 3: Katati Ni Ben – Sweet Banana Bread Skillet Rounds
☀️ About this Recipe
When bananas get too ripe to eat in Kiribati, they become katati — mashed into a batter and fried into sweet, caramelized rounds. Think of it as the island cousin of banana pancakes, but denser, chewier, and with crispy edges from coconut oil. Ben means “fruit” so this is literally “mashed fruit cake.”
This one is a kid-favorite and perfect for breakfast or a 3pm sugar craving. Overripe bananas do all the work for sweetness, so you barely need added sugar. And because it’s pan-fried, you get that custardy middle with golden edges in under 10 minutes.
📝 Ingredients & Measurements
Makes 8 small rounds, serves 2 to 3.
• Very ripe bananas, spotty or black: 2 large, about 1 cup mashed
• All-purpose flour: 1/2 cup
• Desiccated coconut: 1/4 cup
• Baking powder: 3/4 teaspoon
• Salt: 1/8 teaspoon, just a pinch
• Vanilla extract: 1/2 teaspoon, optional but good
• Coconut milk or whole milk: 2 to 3 tablespoons, to loosen batter
• Coconut oil for frying: 2 tablespoons
• Cinnamon: 1/4 teaspoon, optional for warmth
👩🍳 Step-by-Step Instructions
1.Mash and mix: In a bowl, mash bananas until mostly smooth, some lumps are fine. Stir in flour, coconut, baking powder, salt, cinnamon, and vanilla. Add 2 tablespoons coconut milk and mix. Batter should be thick but dropable from a spoon, like muffin batter. If too thick, add 1 more tablespoon milk.
2.Heat the pan: Set a non-stick or cast-iron skillet over medium heat. Add 1 tablespoon coconut oil.
3.Spoon and sizzle: Drop 2 tablespoons of batter per round into the pan. Don’t flatten too much — leave them 1/2 inch thick so they stay custardy inside. Cook 2 to 3 minutes until bubbles pop on top and edges look set and golden.
4.Flip carefully: Slide a thin spatula under, flip, and cook 2 more minutes until the second side is deep golden and the center springs back when touched.
5.Serve hot: Move to a plate. Add more oil and repeat. Best eaten immediately with a drizzle of coconut cream or a sprinkle of extra coconut.
💡 Tips & Mistakes to Avoid
• Banana ripeness matters: Green or just-yellow bananas won’t work. You want them soft, sweet, and fragrant. Black spots = flavor.
• Don’t make them huge: Big rounds take longer to cook through and burn outside before the middle sets. Keep them under 3 inches wide.
• Low and slow if they’re browning too fast: Every stove is different. If the outside is dark at 1 minute, drop the heat. You want caramelized, not burnt.
• No overmixing: Stir just until the flour disappears. Overmixing makes them tough.
• Upgrade: Fold in 2 tablespoons chopped macadamia nuts or dark chocolate chips for a next-level snack.
❓ FAQ
Q1.Can I make this without flour?
Yes. Sub oat flour 1-for-1 for gluten-free. You can also do 100% coconut flour but use only 3 tablespoons and add 1 egg to bind, otherwise it’ll crumble.
Q2.Can I bake these?
You can at 375 degrees Fahrenheit / 190 degrees Celsius for 10–12 minutes on parchment, but you’ll miss the crispy fried edge. Broil 1 minute at the end to help.
Q3.How do I store leftovers?
They’re best fresh. But you can refrigerate 2 days and re-crisp in a dry skillet. They’ll soften in the fridge.
✅ Summary
Katati Ni Ben turns sad bananas into crispy-edged, custardy island treats in 10 minutes. No mixer, no oven, just a bowl, a pan, and pure Pacific comfort.
✨ Final Thoughts: Your Kitchen Is Now I-Kiribati Approved
Look, you don’t need a plane ticket to Tarawa to eat like an I-Kiribati local. These 3 breads prove it. Each one skips the yeast, skips the oven, and still delivers that craveable crispy-chewy texture in 15 minutes or less.
Te Bua Toro Ni Baukin for when you want coconut in every bite. Te Karekare Rourou for when you need a sturdy, dippable flatbread. Katati Ni Ben for when your bananas are begging to be rescued.
The hardest part? Choosing which to make first. So don’t. Try one this week, then come back and knock out the other two. Snap a pic of that golden crust and tag your kitchen win. If you tweaked it — added chili, swapped flours, dunked it in curry — I want to hear about it.
Island food is about sharing, not perfection. So get that pan hot and make your snack break taste like the Pacific. You’ve got this.
| 🇰🇮 🍞 < Back |