
🏠 Home > 🗺️ Recipes > 🍞 Breads > 🇨🇾 Cyprus Breads > 🍞 1.Traditional Savory Flaounes (The Easy Way) , 2.Village-Style Koulouri (Sesame Bread) , 3.Easy Eliopita (Cypriot Olive Bread)
🍞 Effortless Cypriot Baking: Traditional Holiday Breads Made Simple
Published by Supakorn | Updated: April 2026
🇨🇾 🥖 Introduction: Why Cypriot Breads are Your New Holiday Secret Weapon⛱️🌊
Hey there, fellow home baker! I’m so glad you’re here. If you’re anything like me, the holiday season is a beautiful whirlwind of family, decorations, and—let’s be honest—a fair bit of stress in the kitchen. We want everything to taste like it took days to prepare, but who actually has that kind of time?
That is exactly why I fell in love with Cypriot baking. In Cyprus, bread isn't just a side dish; it’s the heart of the celebration. These recipes have been passed down through generations, and while they look impressive and taste like a Mediterranean dream, they are surprisingly forgiving. Whether you're a seasoned pro or someone who just bought their first bag of flour, these breads are going to make you look like a superstar.
In this guide, I’ve handpicked three of the most iconic, crowd-pleasing Cypriot breads:
🎈🎶 • Recipe 1: Traditional Savory Flaounes: The legendary cheese-filled festive pastry.
🎈🎶 • Recipe 2: Village-Style Koulouri: The crunchy, sesame-crusted ring bread.
🎈🎶 • Recipe 3: Easy Eliopita: A savory olive and mint loaf that is pure comfort.
Best of all? I’ve tweaked these methods to fit into a "busy holiday" schedule without losing that authentic soul. Let's get our hands floury and bring some Cypriot sunshine to your holiday table!

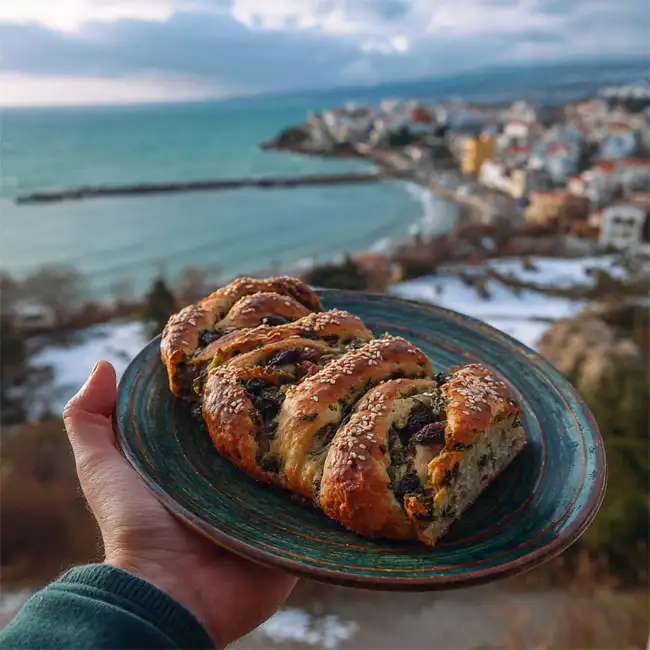
🧀 Recipe 1: Traditional Savory Flaounes (The Easy Way)
🥨 About this Recipe
If Cyprus had a "national holiday bread," Flaounes would be it. Traditionally served at Easter but loved year-round, these are savory cheese pastries packed with mint and raisins. Now, don't let the long list of ingredients scare you! We are going to simplify the process so you can get that signature "springy" cheese filling and golden crust without spending twelve hours in the kitchen. It’s the perfect balance of salty, sweet, and aromatic.
🧂 Ingredients & Measurements
For the Dough:
• 500 grams All-purpose flour
• 1 teaspoon Dry active yeast
• 1/2 teaspoon Salt
• 1 teaspoon Ground Mahlab (this gives that authentic aroma!)
• 1/2 teaspoon Mastic (pounded with a little sugar)
• 60 milliliters Vegetable oil
• 250 milliliters Lukewarm milk
For the Filling (The "Fouko"):
• 500 grams Grated Halloumi or Mild Cheddar (or a mix)
• 3 Large eggs
• 1 teaspoon Baking powder
• 1 tablespoon Dry mint
• 50 grams Raisins (optional but highly recommended)
• 1 tablespoon Sesame seeds (for the topping)
📝 Step-by-Step Instructions
1.Prep the Filling: Start by mixing your grated cheese, mint, and raisins in a bowl. Whisk the eggs and add them to the cheese along with the baking powder. Cover this and let it sit for at least an hour (or overnight in the fridge) to let the flavors marry.
2.Make the Dough: Mix your dry ingredients (flour, yeast, salt, mahlab, mastic). Pour in the oil and rub it into the flour with your fingertips until it looks like breadcrumbs.
3.Knead: Slowly add the lukewarm milk and knead until you have a soft, elastic dough. Cover and let it rise in a warm spot for about 1.5 to 2 hours.
4.Assemble: Roll out the dough into small squares (about 15cm each). Place a generous scoop of the cheese mixture in the center.
5.Fold: Fold the sides over the filling to create a square or triangle shape, leaving the center of the cheese exposed. Press the corners with a fork to seal them.
6.Glaze and Bake: Brush the dough with beaten egg and sprinkle with sesame seeds. Bake at 392°F / 200°C for about 25–30 minutes until they are deeply golden and the cheese has puffed up.
💡 Tips & Mistakes to Avoid
• Don't over-egg the filling: Add the eggs one by one. You want a thick paste, not a runny soup. If it’s too wet, the filling will leak out.
• The Mahlab Secret: If you can't find Mahlab, a tiny pinch of almond extract and orange zest can mimic the vibe, though the real thing is best!
• Seal it Tight: Make sure you press those corners hard. The cheese expands as it bakes, and it will try to "escape" its doughy cage.
❓ FAQ
Q1.Can I freeze Flaounes?
Absolutely! These freeze beautifully. Just reheat them in a toaster oven to get that crunch back.
Q2.What if I don't like raisins?
No problem, just leave them out. The savory version is just as authentic.
📋 Summary
Flaounes are the ultimate conversation starter. They are hearty, unique, and smell like a Mediterranean village. Even a "busy" version tastes miles better than store-bought!

🥯 Recipe 2: Village-Style Koulouri (Sesame Bread)
🥨 About this Recipe
Koulouri is the daily bread of Cyprus. It’s a ring-shaped (or long loaf) bread that is absolutely covered in toasted sesame seeds. It has a distinctive tight crumb and a crunchy exterior. It’s perfect for dipping into olive oil, spreading with jam, or making the best grilled cheese sandwich of your life. This version uses a "straight dough" method to save you time during the holidays.
🧂 Ingredients & Measurements
• 750 grams Strong white bread flour
• 7 grams Dry yeast (1 sachet)
• 1 teaspoon Salt
• 1 tablespoon Sugar
• 450 milliliters Warm water
• 2 tablespoons Olive oil
• 150 grams Sesame seeds (unroasted)
• 50 milliliters Water mixed with 1 teaspoon honey (for the sesame coating)
📝 Step-by-Step Instructions
1.Mix: In a large bowl, combine flour, yeast, salt, and sugar.
2.Hydrate: Add the olive oil and warm water. Mix until a dough forms.
3.Knead: Knead for about 8–10 minutes. This bread likes a bit of work to develop the gluten for that "village" texture.
4.First Rise: Let the dough double in size (usually 1 hour).
5.Shape: Divide the dough into two or three pieces. Roll them into long logs or join the ends to make a large ring.
6.The Sesame Bath: Dip your shaped dough into the honey-water mixture, then immediately roll it in a tray full of sesame seeds. You want it completely covered!
7.Final Proof: Let the loaves rest on a baking sheet for 30 minutes. Use a sharp knife to make deep diagonal slashes across the top.
8.Bake: Bake at 428 degrees Fahrenheit ( 220 degrees Celsius ) for 10 minutes, then drop the temp to 374 degrees Fahrenheit ( 190 degrees Celsius ) for another 20 minutes. It should sound hollow when tapped on the bottom.
💡 Tips & Mistakes to Avoid
• Use the Honey-Water: Don't just sprinkle seeds on top; they will fall off. The honey-water acts as a "glue" and helps the seeds toast to a beautiful golden brown.
• Steam the Oven: Toss a few ice cubes onto the bottom of the oven when you put the bread in. The steam creates a much crispier crust.
• Don't Rush the Rise: If your house is cold, the yeast will move slowly. Give it the time it needs to double, or your bread will be dense.
❓ FAQ
Q1.Why is my Koulouri hard?
This bread is meant to be crusty, but if it’s "rock hard," you likely overbaked it or didn't add enough water to the dough.
Q2.Can I add herbs?
Yes! Adding a tablespoon of aniseed to the dough is a very traditional variation.
📋 Summary
Koulouri is simple, rustic, and honest. It’s the kind of bread that makes your house smell like a professional bakery and goes with literally every holiday meal.
🌿 Recipe 3: Easy Eliopita (Cypriot Olive Bread)
🥨 About this Recipe
Eliopita is the "lazy baker's" dream. Unlike the other two, this is often made as a "rolled" bread or even a muffin-style loaf. It’s loaded with black olives, onions, and fresh mint. It’s naturally vegan (if you don't brush it with egg), making it a great inclusive option for your holiday guests. This recipe focuses on a "one-bowl" style dough that requires very little shaping skill.
🧂 Ingredients & Measurements
• 600 grams Self-rising flour (for a quicker, lighter texture)
• 150 milliliters Orange juice (the secret for a tender crumb!)
• 150 milliliters Vegetable oil
• 200 grams Pitted black olives (chopped)
• 1 Large white onion (finely chopped)
• 2 tablespoons Fresh mint (finely chopped)
• 1 tablespoon Dried mint
• 1 teaspoon Baking powder (extra lift)
📝 Step-by-Step Instructions
1.Sauté: Quickly sauté the chopped onion in a tiny bit of oil until soft. Let it cool.
2.Combine Wet: In a large bowl, whisk the orange juice and oil together.
3.Add Flavor: Stir in the olives, sautéed onions, and all the mint.
4.Incorporate Dry: Gently fold in the self-rising flour and baking powder. Don't overmix! You want a soft, slightly sticky dough.
5.Shape: You can either roll the dough into a large log or scoop it into a greased loaf pan.
6.Bake: Bake at 356 degrees Fahrenheit / 180 degrees Celsius for about 45–50 minutes. Since this is a denser, cake-like bread, check the center with a toothpick to ensure it’s done.
7.Cool: Let it sit in the pan for 10 minutes before moving to a wire rack.
💡 Tips & Mistakes to Avoid
• Dry the Olives: If your olives are sitting in brine, pat them dry with a paper towel before adding them. Excess moisture will make the bread soggy.
• The Orange Juice Trick: Don't skip the OJ! The acidity reacts with the leavening agents to make the bread fluffy and adds a subtle sweetness that balances the salty olives.
• Fine Chop: Make sure your onions are very finely diced. You want their flavor throughout the bread without biting into a huge chunk of onion.
❓ FAQ
Q1.Can I use green olives?
You can, but black olives (especially the wrinkled Throubes variety) provide that authentic Cypriot earthiness.
Q2.How long does it stay fresh?
Because of the oil and orange juice, this bread stays moist for 3-4 days if wrapped well.
📋 Summary
Eliopita is the savory star of the show. It’s salty, herb-forward, and incredibly satisfying. It’s best served warm with a little bit of butter or extra virgin olive oil.
✨ Final Thoughts: You've Got This!
Baking for the holidays doesn't have to be an "all-or-nothing" ordeal. As we've seen with these three Cypriot classics, you can create something deeply traditional and incredibly delicious without losing your mind in the process.
Remember, the "imperfections" in handmade bread are what make it beautiful. A little cheese leaking out of a Flaouna or a Koulouri that isn't a perfect circle just shows your guests that it was made with love, not by a machine.
I encourage you to try one recipe at a time. Start with the Eliopita if you're short on time, or dive into the Koulouri if you want to practice your kneading. Once you taste that first warm slice, you'll see why these breads have been celebrated for centuries.
Happy baking, and may your holiday kitchen be filled with the amazing scents of Cyprus! Don't forget to share your photos and let me know which one was your favorite!
| 🇨🇾 🍞 < Back |