
🏠 Home > 🗺️ Recipes > 🍱 Snacks > 🇻🇪 Venezuela Snacks > 🍱 1.Authentic Venezuelan Tequeños , 2.Classic Arepas Rellenas , 3.Crispy Cornmeal Empanadas
🍱 The Ultimate Guide to Crafting Venezuela's Best Street Food at Home
Published by Supakorn | Updated: June 2026
🇻🇪 🌮 Introduction: Welcome to the Ultimate Venezuelan Snack Party!
Have you ever noticed how some foods just instantly make you feel warm, happy, and incredibly hungry all at the same time? That is the exact magic of Venezuelan street food. Over the last few years, global foodies and passionate travelers have completely fallen in love with Venezuela's culinary scene. Whether people are exploring the stunning Caribbean coastlines, backpacking through the Andes, or just scanning their social media feeds for the next big food trend, one thing is crystal clear: Venezuelan snacks are taking over the world!
If you have ever stepped into a bustling South American market or smelled the rich, buttery aroma wafting out of a local panadería, you know exactly what the hype is about. There is a beautiful, comforting simplicity to this cuisine that connects people across borders. The golden crunches, the melting cheese, and the sweet corn profiles are unlike anything else on the planet.
But guess what? You do not need to buy an expensive plane ticket to Caracas to experience these mind-blowing flavors. You can bring that vibrant, sun-drenched street market energy straight into your own kitchen! In this ultimate deep-dive guide, we are going to hang out, listen to some good music, and learn how to scratch-make the absolute holy trinity of Venezuelan comfort food. Here is the delicious lineup we are mastering today:
🌯 ◦ Recipe 1: Authentic Venezuelan Tequeños (The legendary, hyper-addictive fried cheese spears).
🍘 ◦ Recipe 2: Classic Arepas Rellenas (The ultimate versatile cornmeal pockets packed with savory goodness).
🥟 ◦ Recipe 3: Crispy Cornmeal Empanadas (Deep-fried, crescent-shaped pockets of pure joy).
Seriously, tie your apron on, clear off your kitchen counter, and let's get cooking. Your tastebuds are going to thank you for this!

🧀 Recipe 1: Authentic Venezuelan Tequeños
🌟 About this Recipe
If you go to a Venezuelan wedding, a birthday party, a casual backyard hangout, or a major holiday celebration and there are no Tequeños, did the party even actually happen? The answer is a definitive no! Tequeños are the undisputed kings of the Venezuelan snack universe. At their core, they are spear-shaped pieces of rich, salty white cheese wrapped perfectly in a blanket of slightly sweet, flaky pastry dough, then deep-fried until they reach absolute golden perfection.
Legend has it that these irresistible bites originated in the beautiful city of Los Teques, where wealthy families from Caracas would spend their vacations. The family cooks began wrapping leftover pastry dough around local cheese chunks, and boom—an iconic global phenomenon was born. When you bite into a fresh, hot Tequeño, the outer crust shatters beautifully, immediately followed by an incredibly satisfying, stretchy pull of warm, melted cheese. It is the ultimate crowd-pleaser, and once you eat one, it is physically impossible to stop.
📝 Ingredients & Measurements
◦ All-purpose flour: 2.5 cups
◦ Unsalted butter (melted and cooled): 5 tablespoons
◦ Large egg: 1 piece
◦ Warm water: 0.5 cup
◦ Fine sea salt: 1 teaspoon
◦ Granulated sugar: 1 teaspoon
◦ Venezuelan Queso Blanco or firm, salty white baking cheese (cut into 3x0.5-inch sticks): 1 pound
◦ Vegetable oil (for deep frying): 4 cups
👩🍳 Step-by-Step Instructions
1.Prepare the Dough Base: In a large mixing bowl, whisk together the all-purpose flour, sea salt, and granulated sugar until thoroughly combined.
2.Integrate the Wet Ingredients: Create a small well in the center of your flour mixture. Pour in the melted unsalted butter and the cracked egg. Using a fork, gently mix the egg and butter, slowly pulling in flour from the edges.
3.Hydrate and Knead: Gradually add the warm water into the mixture, stirring continuously until a shaggy dough begins to form. Turn the dough out onto a lightly floured surface and knead vigorously for about 6 to 8 minutes. You are looking for a smooth, elastic texture that no longer sticks to your fingers.
4.Rest the Dough: Form the dough into a smooth ball, wrap it tightly in plastic wrap, and let it rest on your kitchen counter at room temperature for a full 30 minutes. This relaxes the gluten, making it much easier to roll out later.
5.Roll it Out Thin: After the resting period, dust your counter with a little more flour. Use a rolling pin to roll the dough out into a large, uniform rectangle, roughly 1/8-inch in thickness.
6.Cut the Dough Strips: Using a sharp pizza cutter or a utility knife, slice the dough into long, even vertical strips, each about 3/4-inch wide.
7.Wrap the Cheese Carefully: Take one cheese stick and secure one end of a dough strip over the top tip of the cheese. Wind the dough strip down around the cheese stick diagonally, ensuring that each layer overlaps the previous one slightly. This creates an airtight seal so the cheese cannot escape during frying. Pinch and seal the bottom end firmly. Repeat with all remaining sticks.
8.Heat the Frying Medium: Pour your vegetable oil into a deep, heavy-bottomed pot or Dutch oven. Heat the oil over medium heat until it reaches 350 degrees Fahrenheit ( 176 degrees Celsius ).
9.Fry to Golden Perfection: Working in small batches of 4 or 5 so you do not crowd the pot, gently lower the wrapped dough sticks into the hot oil. Fry for approximately 3 to 4 minutes, turning them occasionally, until the exterior pastry is beautifully golden brown and crispy.
10.Drain and Cool Slightly: Use a slotted spoon to transfer the hot Tequeños onto a plate lined with paper towels to drain off any excess surface oil. Let them cool down for just 2 minutes so you don't burn your mouth, then serve immediately!
⚠️ Tips & Mistakes to Avoid
◦ The Overlap Rule: Never leave any gaps when wrapping the dough around the cheese. If there is even a microscopic hole, the cheese will instantly liquefy, leak out into the hot oil, and cause dramatic splattering.
◦ Choose the Right Cheese: Do not use traditional mozzarella for this recipe; it has way too much moisture and will melt into water instantly. Look for firm, semi-salty white cheeses like Paisa, Queso Blanco, or even a low-moisture Halloumi or Cotija if you are in a pinch.
◦ Keep Oil Temperature Steady: If your frying oil is too cold, the dough will absorb grease like a sponge and become incredibly soggy. If the oil is too hot, the pastry dough will burn on the outside before the internal cheese stick even has a chance to soften up.
💬 FAQ
Q1.Can I freeze Tequeños before frying them?
Yes, absolutely! In fact, freezing them is a fantastic trick. Lay the raw, wrapped Tequeños out on a baking sheet in a single layer and freeze them until solid. Then transfer them to a zip-top bag. Fry them straight from the freezer, just adding an extra minute to the total cooking time.
Q2.Can I bake these in an oven or an air fryer instead?
While deep-frying is the traditional, authentic path to glory, you can absolutely air fry them. Lightly spray the raw Tequeños with cooking oil and air fry at 400 degrees Fahrenheit / 204 degrees Celsius for 8 to 10 minutes, flipping halfway through, until crispy.
📝 Summary
Homemade Venezuelan Tequeños are the ultimate crowd-pleasing finger food. They balance a flaky, delicate pastry crust with a rich, savory, meltingly warm cheese center that keeps everyone reaching across the table for more. Master the seal technique, and you will be the absolute hero of every single party you host!

🌮 Recipe 2: Classic Arepas Rellenas
🌟 About this Recipe
If you want to understand the true beating heart of Venezuelan culture, you absolutely have to understand the Arepa. This is not just a snack; it is a daily staple, a cultural icon, and an absolute way of life. Arepas are gorgeous, round, unleavened cornmeal patties that feature a wonderfully crispy, griddled crust on the outside and a soft, steaming, cloud-like texture on the inside. They are naturally gluten-free and act as the perfect blank canvas for an infinite variety of savory fillings.
Historically, indigenous tribes across Venezuela have been preparing variations of the arepa for thousands of years, originally grinding the corn kernels by hand between heavy stones. Today, thanks to pre-cooked white cornmeal, making them at home takes mere minutes. The beauty of the arepa lies in how you split it open like a pita pocket and stuff it to the absolute brim. In this version, we are stuffing our golden corn pockets with a legendary filling combo: shredded savory chicken mixed with creamy avocado, sweet mayonnaise, and fresh herbs—famously known across Venezuela as the Reina Pepiada (The Curvy Queen).
📝 Ingredients & Measurements
For the Arepa Shells:
◦ Pre-cooked white cornmeal (specifically Harina P.A.N. brand): 2 cups
◦ Lukewarm water: 2.5 cups
◦ Fine sea salt: 1 teaspoon
◦ Vegetable oil (for greasing the pan): 2 tablespoons
For the Reina Pepiada Filling:
◦ Shredded cooked chicken breast: 2 cups
◦ Ripe Hass avocado (mashed smoothly): 1 large piece
◦ Mayonnaise: 3 tablespoons
◦ Finely minced white onion: 0.25 cup
◦ Finely chopped fresh cilantro: 2 tablespoons
◦ Fresh lime juice: 1 tablespoon
◦ Garlic powder: 0.5 teaspoon
◦ Salt and freshly cracked black pepper: To taste
👩🍳 Step-by-Step Instructions
1.Hydrate the Cornmeal Mixture: In a large, deep bowl, pour in your lukewarm water and dissolve the fine sea salt completely.
2.Incorporate the Flour Slowly: Slowly rain the pre-cooked white cornmeal into the salted water with one hand while continuously mixing with your other hand. This slow process prevents lumps from forming.
3.Knead the Dough: Once all the flour is added, use your hands to knead the mixture directly in the bowl for about 3 minutes. The cornmeal will rapidly absorb the water, turning into a smooth, pliable dough that feels a bit like soft playdough.
4.Let the Dough Rest: Shape the dough into a neat ball, cover the bowl with a damp kitchen towel, and let it rest quietly for 10 minutes to finish hydrating.
5.Portion and Shape: Divide the rested dough into 4 or 5 equal-sized balls. Take one ball in your hands and gently flatten it between your palms, shaping and smoothing the edges to create a round disc that is roughly 4 inches in diameter and about 1/2-inch thick. Ensure there are no large cracks around the perimeter.
6.Griddle the Arepas: Heat a heavy cast-iron skillet or a traditional budare over medium heat and lightly coat the surface with vegetable oil. Place your corn discs onto the hot surface. Cook undisturbed for about 5 to 7 minutes on the first side until a beautiful, pale-golden crust forms. Flip and cook for another 5 to 7 minutes on the opposite side.
7.Finish in the Oven (Optional but Recommended): For the ultimate interior texture, transfer the griddled arepas onto a wire rack inside a preheated oven at 350 degrees Fahrenheit ( 176 degrees Celsius ) for 8 to 10 minutes. When you tap the center of the finished arepa, it should sound distinctively hollow.
8.Construct the Savory Filling: While the arepas are baking, combine your shredded chicken breast, mashed ripe avocado, mayonnaise, minced white onion, chopped cilantro, fresh lime juice, garlic powder, salt, and black pepper in a mixing bowl. Stir vigorously until everything incorporates into a rich, creamy, green chicken salad.
9.Slice and Stuff: Let the cooked arepas cool down for about 3 minutes so they are safe to handle. Take a sharp serrated knife and slice horizontally into the edge of the arepa, cutting about 3/4 of the way through to create a spacious pocket. Leave the bottom edge intact.
10.Load it Up: Spoon a generous, overflowing amount of your creamy chicken and avocado filling directly into the steaming hot pocket. Serve warm and enjoy the pure bliss!
⚠️ Tips & Mistakes to Avoid
◦ The Right Flour is Mandatory: You cannot use standard American cornmeal, cornstarch, or Mexican masa harina for this recipe. It absolutely must be labeled as Pre-cooked Cornmeal (Harina de Maíz Precocida), with Harina P.A.N. being the golden standard worldwide.
◦ Fixing Cracks Immediately: If you notice your dough discs are cracking significantly around the edges while you are shaping them, it means your dough is a bit too dry. Simply dip your hands in warm water and knead the dough a little more to restore moisture.
◦ Do Not Rush the Griddle: Keep your heat at a steady medium level. If your heat is way too high, the outside of the cornmeal pocket will char and burn before the internal dough has a chance to fully steam and cook through, leaving you with a gummy, unpleasant center.
💬 FAQ
Q1.Can I make arepa dough ahead of time?
It is best to cook them fresh because the pre-cooked cornmeal continues to dry out as it sits. However, you can wrap shaped, uncooked discs in plastic wrap and keep them in the fridge for up to 24 hours before griddling.
Q2.What other fillings can I use?
The sky is the limit! Try shredded beef and black beans (called Pabellón), simple ham and melty yellow cheese, or even just a thick slab of fresh white cheese and butter.
📝 Summary
Arepas are the undisputed ultimate customizable comfort food. With their beautifully crunchy exterior crust and soft, cloud-like center, they hold up perfectly to rich fillings like the avocado-loaded Reina Pepiada. Once you master the simple dough ratio, you can turn any leftovers in your fridge into a gourmet Venezuelan masterpiece!
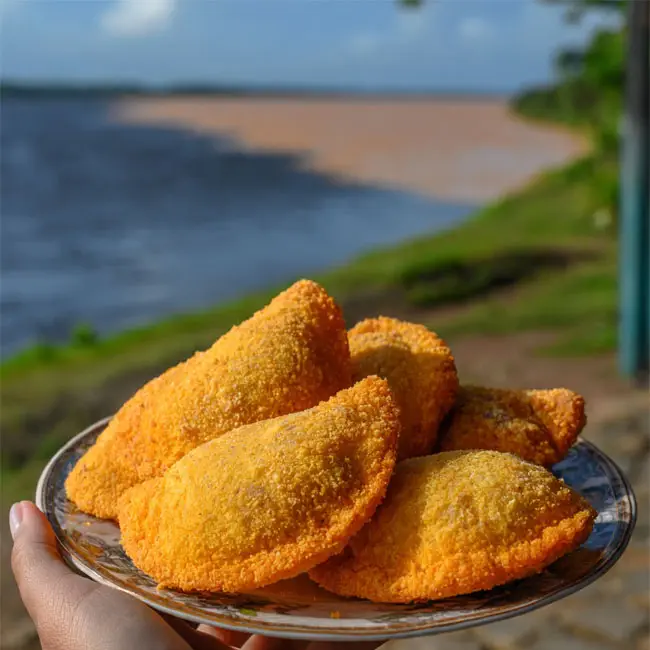
🥟 Recipe 3: Crispy Cornmeal Empanadas
🌟 About this Recipe
If you find yourself strolling along the sunny beaches of Margarita Island early in the morning, the exact sound you will hear everywhere is the crackle of hot oil frying up fresh Venezuelan Empanadas. While many people are deeply familiar with baked Argentine or Chilean empanadas made with wheat flour dough, the Venezuelan variety stands entirely in a league of its own. These beauties are crafted from the exact same pre-cooked cornmeal dough as our beloved arepas, but the dough is flattened incredibly thin, stuffed with savory fillings, folded into gorgeous crescents, and deep-fried to a phenomenal crunch.
The magic of the Venezuelan empanada lies in the slight sweetness of the outer corn shell contrasting elegantly with a deeply savory, seasoned filling. They are crispy, bubbly, and absolutely bursting with juices when you take that first monumental bite. Street vendors across the country serve them up daily alongside a colorful array of vibrant sauces, making them the ultimate handheld fuel for busy mornings or late-night cravings. Today, we are filling ours with a deeply seasoned, traditional ground beef filling that is incredibly rich and savory.
📝 Ingredients & Measurements
For the Sweet Corn Dough:
◦ Pre-cooked white cornmeal: 2 cups
◦ Lukewarm water: 2.25 cups
◦ Granulated sugar: 1.5 tablespoons
◦ Fine sea salt: 1 teaspoon
◦ Vegetable oil (for frying): 4 cups
For the Seasoned Beef Filling:
◦ Lean ground beef: 1 pound
◦ Finely chopped red bell pepper: 0.5 cup
◦ Finely chopped white onion: 0.5 cup
◦ Minced garlic cloves: 3 pieces
◦ Tomato paste: 1 tablespoon
◦ Ground cumin: 0.5 teaspoon
◦ Olive oil: 1 tablespoon
◦ Salt and black pepper: To taste
👩🍳 Step-by-Step Instructions
1.Sauté the Aromatic Base: Heat one tablespoon of olive oil in a large skillet over medium heat. Toss in your chopped white onion, red bell pepper, and minced garlic. Cook for roughly 4 to 5 minutes until the vegetables soften and release their incredible fragrance.
2.Brown the Beef: Add the ground beef into the skillet with the vegetables. Use a wooden spoon to break the meat apart into very fine pieces as it cooks. Sauté until the beef is fully browned and no pink remains, about 7 to 8 minutes.
3.Season and Simmer: Stir in the tomato paste, ground cumin, salt, and black pepper. Pour in about 1/4 cup of water, reduce the heat to low, and let the mixture simmer gently for 10 minutes until most of the liquid evaporates, leaving you with a moist, intensely flavorful beef filling. Take the skillet off the heat and let the filling cool down to room temperature.
4.Create the Empanada Dough: In a large bowl, whisk together the lukewarm water, sugar, and fine sea salt until the sweet crystals completely dissolve. Slowly pour in the pre-cooked white cornmeal, mixing continuously with your fingers until a smooth, pliable dough forms. Let it rest for 5 minutes.
5.Set Up the Press Station: Cut open a clean, plastic zip-top bag or use a large piece of heavy-duty plastic wrap. Lay it flat across your counter and lightly wipe it down with a damp cloth or a drop of oil to prevent any sticking.
6.Flatten the Dough Ball: Grab a portion of the corn dough and shape it into a neat ball, roughly the size of a large lime. Place the ball directly in the center of your plastic sheet, fold the other half of the plastic wrap over the top, and use a flat-bottomed plate or a rolling pin to press down firmly until you create a thin, perfect circle, about 1/8-inch thick.
7.Add Filling and Fold: Open up the top layer of plastic. Place a generous tablespoon of your cooled beef filling right into the center-top half of the dough circle. Grab the bottom edge of the plastic wrap and carefully fold the dough over the meat filling, aligning the edges to create a neat half-moon crescent shape.
8.Seal and Trim Cleanly: Use the rim of a small bowl or a large drinking glass, pressing it down firmly over the plastic-covered crescent edge to slice through the excess dough. This creates an incredibly clean, perfectly uniform, tightly sealed edge. Peel away the excess dough and lift off the plastic.
9.Fry to Deep Golden Brown: Heat your vegetable oil in a deep pot to 360 degrees Fahrenheit or 182 degrees Celsius. Carefully slide the raw empanada into the hot oil. Fry for about 4 to 5 minutes per side, turning carefully with tongs, until the exterior shell develops tiny beautiful bubbles and turns a gorgeous, crisp golden-yellow.
10.Drain and Enjoy Hot: Transfer the crispy empanadas to a wire rack or paper towels to drain off any residual frying oil. Serve them piping hot alongside a side of fresh garlic sauce or avocado cream!
⚠️ Tips & Mistakes to Avoid
◦ Cool the Filling Completely: Never put hot or warm filling onto raw cornmeal dough. The heat will immediately melt the dough structure, making it impossibly sticky, fragile, and prone to tearing completely apart when you try to lift it into the hot oil.
◦ The Sugar Factor: Do not skip the little bit of sugar in the dough mixture. It gives the dough that authentic, subtle street-food sweetness and helps the cornmeal caramelize beautifully into a bright golden hue when fried.
◦ Drain the Filling Juice: Make sure your beef filling isn't swimming in a pool of loose liquid or grease. Excess liquid will seep through the delicate corn dough, creating steam pockets that will burst open and cause dangerous pops in your hot frying oil.
💬 FAQ
Q1.Can I use leftover stews for the filling?
Absolutely! Leftover shredded chicken, black beans and cheese, or even flaked fish work incredibly well as long as the mixture is relatively dry and cooled down.
Q2.Why did my empanada break open in the oil?
This usually happens if the dough was pressed way too thin or if the filling contained too much liquid. Make sure your crescent seam is pressed firmly together using the bowl trick to guarantee an airtight seal.
📝 Summary
Crispy Venezuelan cornmeal empanadas are the ultimate texture experience. The subtle sweetness of the crispy, bubbly corn crust contrasts beautifully with the savory, aromatic ground beef interior. They are fun to assemble, fry up incredibly fast, and are guaranteed to bring high-energy smiles to your kitchen table!
🏁 Final Thoughts: Your Kitchen, Your New Venezuelan Hotspot!
And there you have it—you have officially mastered the grand slam of Venezuelan snack culture! From the gloriously stretchy, comforting pull of a fresh homemade Tequeño, to the hearty, avocado-infused bliss of a loaded Arepa Reina Pepiada, all the way to the satisfying, shattered-crunch of a golden beef Empanada, you now possess the culinary keys to a vibrant world of flavor.
As you saw throughout these recipes, making these iconic snacks at home isn't about fussing over complex culinary degrees or hunting down impossible-to-find gadgets. It is about using humble, beautiful ingredients like pre-cooked cornmeal, rich white cheeses, and vibrant fresh aromatics, and infusing them with love, patience, and a whole lot of fun.
Instead of trying to overwhelm yourself by tackling all three of these massive recipes in a single afternoon, here is a fun game plan: pick just one specific snack to start with this coming weekend. Gather a few close friends, turn on a lively playlist, and dive headfirst into the process together. Once you master the simple dough-handling techniques and get a feel for the frying temperatures, move on to the next recipe on the list!
Food is meant to be a shared journey that brings people together, sparks laughter, and creates unforgettable memories. So go ahead, get your hands a little floury, smash some avocados, fry up some cheese, and don't forget to share your incredible creations and kitchen triumphs with the people you love. Happy cooking, enjoy every single crunchy bite, and ¡Buen provecho!
| 🇻🇪 🍱 < Back |