
🏠 Home > 🗺️ Recipes > 🍞 Breads > 🇻🇺 Vanuatu Breads > 🍞 1.Soft Coconut Milk Buns (Nambawan Buns) , 2.Mild Sweet Taro Bread , 3.Island Style Steamed Cassava Cake-Bread
🍞 Soft, Fluffy, and Tropical: The Gentle Art of Vanuatu Baking
Published by Supakorn | Updated: February 2026
Hey there, fellow carb-lover! If you have ever felt that the world of artisanal bread has become a bit too "crusty" or complicated with sourdough starters and 48-hour fermentations, then you are going to absolutely love the baking style of Vanuatu.
In the heart of the South Pacific, bread isn't just about the crunch; it’s about the softness, the warmth, and that subtle hint of tropical sweetness. Vanuatu baking is gaining a huge following abroad because it’s incredibly "gentle"—gentle on the stomach, gentle to bake, and incredibly mild in flavor, making it a hit with everyone from toddlers to grandparents.
The secret to these breads isn't a fancy oven or expensive flour; it’s the way the locals use natural fats from coconuts and the soft starches from island root crops. In this guide, we are going to explore three of the most popular, mild-flavored breads that define the "easy-going" lifestyle of the islands. We will be walking through:
🤴 • Recipe 1: Soft Coconut Milk Buns (Nambawan Buns)
🤴 • Recipe 2: Mild Sweet Taro Bread
🤴 • Recipe 3: Island Style Steamed Cassava Cake-Bread
Ready to fill your home with the scent of a tropical morning? Let’s get our aprons on!
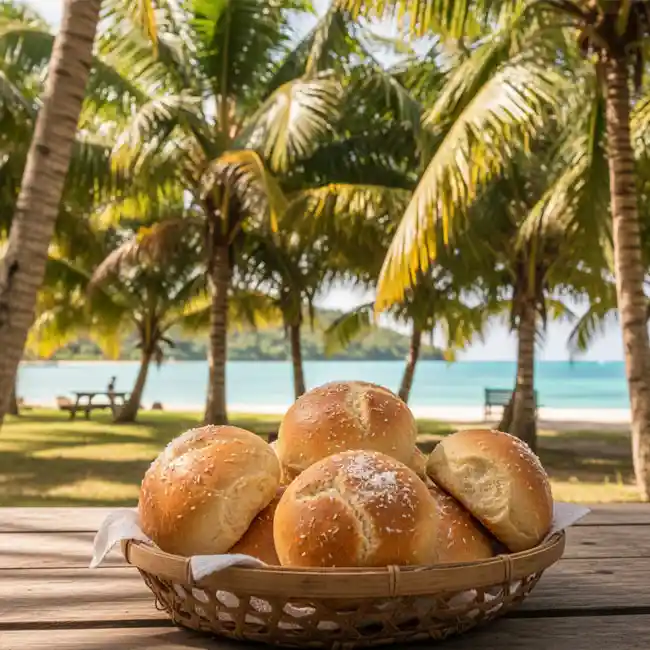
🥥 Recipe 1: Soft Coconut Milk Buns (Nambawan Buns)
🥖 About this Recipe
In Bislama (the local language), "Nambawan" means "Number One," and these buns certainly live up to the name. If you’ve ever had a Hawaiian roll, imagine that, but better. These buns are the staple of every Vanuatu tea-time. They are incredibly pillowy, slightly sweet, and get their richness from fresh coconut milk instead of heavy butter. They are the ultimate "gentle" bread—perfect for a morning snack or as a side to a savory soup.
📝 Ingredients & Measurements
• 500 grams of All-Purpose Flour (plus extra for dusting)
• 250 milliliters of warm Coconut Milk (full fat is best)
• 7 grams of Active Dry Yeast (1 sachet)
• 50 grams of Granulated Sugar
• 1 large Egg (at room temperature)
• 50 grams of Coconut Oil (melted)
• 1 teaspoon of Sea Salt
• 1 tablespoon of extra Coconut Milk for brushing the tops
👩🍳 Step-by-Step Instructions
1.Activate the Yeast: In a small bowl, mix the warm coconut milk with one tablespoon of the sugar and the yeast. Let it sit for 10 minutes until it becomes frothy and smells like a brewery.
2.Mix the Dough: In a large mixing bowl, combine the flour, remaining sugar, and salt. Make a well in the center and pour in the yeast mixture, the melted coconut oil, and the whisked egg.
3.The Knead: Stir until a shaggy dough forms. Turn it out onto a floured surface and knead for about 8 to 10 minutes. You are looking for a smooth, elastic dough that bounces back when poked.
4.First Rise: Place the dough in a lightly oiled bowl, cover with a damp cloth, and let it rise in a warm spot for about 1 to 1.5 hours, or until it has doubled in size.
5.Shape the Buns: Punch the dough down to release the air. Divide it into 12 equal pieces and roll them into smooth balls. Place them in a greased baking tin, leaving a little space between each.
6.Second Rise: Cover and let them rise again for another 30 to 45 minutes. They should be looking plump and touching each other now.
7.Bake: Preheat your oven to 356 degrees Fahrenheit or 180 degrees Celsius. Gently brush the tops of the buns with coconut milk. Bake for 20 to 25 minutes until the tops are a beautiful golden brown.
8.Cool: Let them cool in the tin for 5 minutes before transferring to a wire rack.
💡 Tips & Mistakes to Avoid
• Mistake - Hot Milk: If your coconut milk is too hot (above 113∘F ( 45∘C ), it will kill the yeast and your buns will be like hockey pucks. It should feel like a warm bath.
• Tip - Full Fat is Key: Don't use "light" coconut milk. The fat in the coconut is what replaces the butter and gives the bread its signature soft crumb.
• Tip - Humidity Matters: If you live in a dry climate, you might need a tablespoon more coconut milk. If it's humid, you might need an extra sprinkle of flour.
• Mistake - Over-baking: These buns should be soft. If you bake them too long, the crust will become hard. Take them out as soon as they are golden!
❓ FAQ
Q1.Can I make these vegan?
Yes! Just replace the egg with an extra 2 tablespoons of coconut milk or a flax egg.
Q2.Can I use a bread machine?
Absolutely. Use the "Dough" setting and then proceed from the shaping step.
Q3.How long do they stay soft?
Because of the coconut fat, they stay soft for about 2 days in an airtight container.
📝 Summary
The Nambawan Coconut Bun is the gateway to Vanuatu baking. It’s a gentle, comforting bread that pairs perfectly with tropical jams or just a simple smear of butter. It’s the "comfort food" of the Pacific.
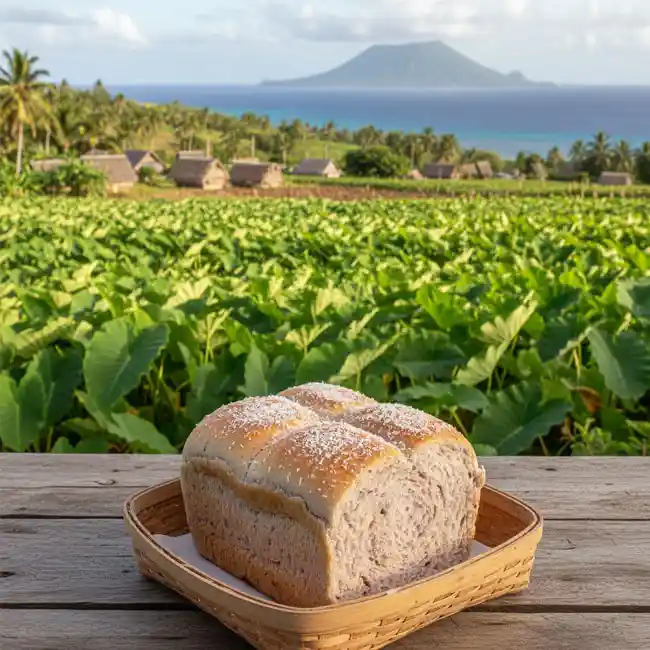
🍠 Recipe 2: Mild Sweet Taro Bread
🥖 About this Recipe
Taro is the backbone of the Vanuatu diet. While it's usually eaten boiled or roasted, it makes an incredible addition to bread dough. This bread has a slightly denser, "moister" crumb than wheat-only bread and a very subtle, nutty flavor. It is naturally purple-hued (if using purple taro), making it a visually stunning, mild-flavored loaf that is perfect for toast.
📝 Ingredients & Measurements
• 400 grams of Bread Flour
• 200 grams of Taro (peeled, boiled, and mashed until very smooth)
• 150 milliliters of warm Water
• 50 grams of Honey
• 7 grams of Active Dry Yeast
• 30 grams of Coconut Oil
• 1 teaspoon of Sea Salt
👩🍳 Step-by-Step Instructions
1.Prepare the Taro: Boil your taro until it's very soft. Mash it while hot to ensure there are zero lumps. Let it cool until it’s just warm.
2.Yeast Prep: Dissolve the honey in the warm water and add the yeast. Let it bloom for 10 minutes.
3.Combine: In a large bowl, mix the flour and salt. Add the mashed taro and the yeast mixture.
4.Knead: Mix by hand or with a stand mixer. Taro dough can be a bit stickier than usual, so don't be tempted to add too much flour. Knead for 10 minutes until the dough is smooth and the taro is perfectly incorporated.
5.Rise: Let the dough rise in a warm place for about 1.5 hours.
6.Shape: Shape the dough into a loaf and place it into a greased loaf tin.
7.Proof: Let it rise in the tin for another 45 minutes.
8.Bake: Bake at 375°F / 190°C for 30 to 35 minutes. If the top browns too quickly, cover it with a bit of foil.
9.Test: Tap the bottom of the loaf; if it sounds hollow, it's done!
💡 Tips & Mistakes to Avoid
• Tip - Mash it Well: Any lumps in your taro will show up as hard bits in your finished bread. A potato ricer is great for this!
• Mistake - Too Much Flour: Taro dough feels "tacky" because of the starch in the root. Keep kneading rather than adding more flour, or your bread will be dry.
• Tip - Honey over Sugar: Honey complements the earthy, nutty flavor of the taro much better than white sugar does.
Tip - Color Check: If you want that beautiful purple color, make sure you buy the taro variety that is purple inside!
❓ FAQ
Q1.Is this bread gluten-free?
No, it uses bread flour as the base to give it structure. The taro adds moisture and flavor.
Q2.Can I use sweet potato instead?
Yes! Sweet potato bread is a common variation and is just as delicious and mild.
Q3.What does it taste like?
It’s very mild, with a slightly sweet and "earthy" finish that is much more interesting than plain white bread.
📝 Summary
Taro bread is a fantastic way to introduce root crops into your baking. It’s a hearty, mild loaf that carries the "weight" of island tradition in every slice.

🎋 Recipe 3: Island Style Steamed Cassava Cake-Bread
🥖 About this Recipe
This is where the line between "bread" and "cake" gets beautifully blurry. In Vanuatu, steaming is a very common way to cook starch. This cassava bread is flourless, making it a "gentle" option for those who are sensitive to wheat. It has a unique, slightly chewy texture (think of a very firm pudding) and a clean, mild coconut flavor. It’s traditionally eaten in the afternoon with a cup of tea.
📝 Ingredients & Measurements
• 1 kilogram of fresh Cassava (peeled and finely grated)
• 400 milliliters of thick Coconut Cream
• 150 grams of Sugar (adjust to your preference)
• 1/2 teaspoon of Sea Salt
• 1 teaspoon of Vanilla Extract
• Banana leaves (for lining the steamer)
👩🍳 Step-by-Step Instructions
1.Grate and Squeeze: Grate the cassava finely. Place it in a cloth and squeeze out about half of the juice (don't squeeze it bone-dry).
2.Mix: In a large bowl, combine the grated cassava, sugar, salt, and vanilla.
3.The Cream: Gradually stir in the coconut cream until you have a thick, spoonable batter.
4.Prepare the Steamer: Line a steamer basket or a heat-proof cake tin with banana leaves (or parchment paper).
5.Pour: Pour the mixture into the tin and smooth the top.
6.Steam: Place in a steamer over boiling water. Cover and steam for about 45 to 55 minutes. The bread is done when it feels firm to the touch and has turned from white to a pale, translucent yellow.
7.Cooling is Vital: You cannot cut this while it's hot! Let it cool completely at room temperature, then chill it in the fridge for 2 hours to let the starches set.
8.Slice: Slice into squares and serve.
💡 Tips & Mistakes to Avoid
• Mistake - Cutting too Early: If you cut this bread while it's warm, it will be "gooey" and stick to the knife. It needs time to firm up.
• Tip - Fresh over Frozen: Fresh cassava has a much better flavor, but if you use frozen, make sure it is fully thawed and drained.
• Tip - Thick Cream: Use the thickest coconut cream you can find (the stuff at the top of the can) for the richest flavor.
• Mistake - Over-steaming: If you steam it for too long, it can become a bit tough. 50 minutes is usually the perfect mark.
❓ FAQ
Q1.Is this a dessert?
It can be! But in Vanuatu, it’s often eaten as a breakfast bread or a midday snack.
Q2.Can I add fruit?
Adding a layer of sliced bananas in the middle of the batter before steaming is a common and delicious "upgrade."
Q3.How do I store it?
Since it's very moist, store it in the fridge for up to 4 days.
📝 Summary
The Steamed Cassava Cake-Bread is a gluten-free marvel. It’s mild, sweet, and has a fascinating texture that is a wonderful break from traditional oven-baked loaves.
🌈 Final Thoughts
Baking your way through the islands of Vanuatu is such a rewarding experience because the recipes are so honest. There are no hidden chemicals or complex techniques—just the relationship between the cook, the coconut, and the local roots.
These three recipes show the "gentle" side of the Pacific. They aren't meant to be aggressive or overly salty; they are meant to be a soft companion to your day. Whether you start with the fluffy coconut buns, the nutty taro bread, or the chewy cassava cake, you are bringing a piece of "Island Time" into your home.
Don't be afraid to try them one by one. Baking is a journey, and the tropical flavors of Vanuatu are the perfect destination. I’d love to hear which one you try first—did the coconut buns disappear in five minutes like they do at my house? Let me know and share your baking stories!
| 🇻🇺 🍞 < Back |