
🏠 Home > 🗺️ Recipes > 🥘 Sauces > 🇰🇪 Kenya Sauces > 🥘 1.Fresh & Zesty Kachumbari (The Kenyan Salsa) , 2.Infused Pili Pili Sauce (The Kenyan Fire) , 3.Coastal Ukwaju (Tamarind) Dipping Sauce
🥘 Level Up Your Summer Plates with These Zesty Kenyan Sauce Classics
Published by Supakorn | Updated: March 2026
Hey there, flavor explorer! If you’ve been hanging out with me lately, you know we’ve been diving deep into the heart of East African comfort food. We’ve talked about the hearty soups and the flaky breads, but today, we’re touching on the "secret weapon" of every Kenyan kitchen. I’m talking about the Sauces.
In Kenya, a sauce isn't just something you hide in a corner of your plate. It’s the spark that turns a simple grilled dinner into a vibrant, tropical feast. As the summer sun starts to shine, our palates naturally crave something with a bit of "zing"—something acidic, spicy, and fresh. Kenyan sauces are perfectly designed for this. They cut through the richness of grilled meats and add a pop of color to every bite.
Lately, these bold condiments have been making waves in international food markets. From gourmet hot sauce fans to healthy salad lovers, everyone is discovering that Kenyan flavors are the perfect balance of heat and heart. In this guide, I’m sharing 3 Legendary Recipes that are staples in my home and will soon be in yours:
🌶️ • Recipe 1: Kachumbari: The fresh, vibrant "salsa" that defines Kenyan BBQ.
🌶️ • Recipe 2: Homemade Pili Pili: the fiery, garlic-infused chili oil that adds a kick to everything.
🌶️ • Recipe 3: Ukwaju (Tamarind) Sauce: The tangy, exotic dip that is the soul of coastal street food.
Ready to make your summer dinners unforgettable? Let’s get saucy!
🥣🌶️Introduction: The Magic of the Kenyan Side-Plate 🇰🇪 🪔🔥
You might be wondering, "What makes Kenyan sauces different?" Well, it’s all about the balance. While some cuisines cook the spice into the main dish, Kenyans love to serve the intensity on the side. This is great because it means your dinner is totally customizable.
Internationally, there’s a massive movement toward "fresh and raw" condiments, and Kenya has been the master of this for generations. These recipes are gaining traction because they use clean, whole-food ingredients—no weird thickeners or hidden sugars here! They are naturally vegan, gluten-free, and packed with vitamin C and antioxidants from all those fresh peppers and tomatoes.
In this article, I’m going to be your kitchen buddy. I’ve broken down these recipes into simple, non-intimidating steps. You don’t need any fancy equipment—just a sharp knife, a blender (for some), and a love for bold tastes. By the end of this, you’ll see that a small bowl of sauce can make a massive difference in your cooking. Let’s dive into our first summer classic!

🥗 Recipe 1: Fresh & Zesty Kachumbari (The Kenyan Salsa)
🇰🇪 🍅 About this Recipe
If you walk into a Kenyan "Nyama Choma" (roast meat) joint, the first thing they’ll put on your table is a bowl of Kachumbari. It is the unofficial national salad/sauce of Kenya. It’s incredibly simple—no cooking involved—but it’s the most refreshing thing you’ll ever eat on a hot summer day. The combination of sweet tomatoes, crunchy onions, and zesty lime makes it the perfect partner for anything grilled.
📝 Ingredients & Measurements
• 4 large, ripe Roma Tomatoes (Firm but juicy)
• 1 large Red Onion
• 1 bunch of Fresh Cilantro/Dhania (Finely chopped)
• 1 small Green Chili (Optional, seeds removed and finely minced)
• 1 large Lime or Lemon (Juiced)
• 1 teaspoon of Sea Salt
• 1 tablespoon of Extra Virgin Olive Oil (Optional, for a silky finish)
👩🍳 Step-by-Step Instructions
1.The Onion Secret: This is the most important step! Dice your red onion very finely. Place the pieces in a small bowl of cold water with a teaspoon of salt. Let them soak for 10 minutes. This removes the harsh "sting" and keeps them sweet and crunchy.
2.Prep the Tomatoes: While the onions soak, dice your tomatoes into small, even cubes. If they are very watery, you can remove the seeds first.
3.Rinse the Onions: Drain the onions and rinse them under cold water. Pat them dry with a paper towel.
4.Combine: In a large glass bowl, toss together the tomatoes, onions, cilantro, and chili.
5.Dress the Sauce: Pour the lime juice and olive oil over the mixture. Sprinkle with salt.
6.The Toss: Gently mix everything together. Be careful not to mash the tomatoes—you want those distinct cubes!
7.Chill: For the best flavor, let the Kachumbari sit in the fridge for about 15–20 minutes before serving. This allows the lime juice to "pickle" the veggies slightly.
💡 Tips & Mistakes to Avoid
• Don't Skip the Soak: If you don't soak the onions, their flavor will overpower everything else. The salt-water soak is the "Kenyan Way."
• Use Ripe Tomatoes: Since there are so few ingredients, the quality of your tomatoes matters a lot. Use the best ones you can find.
• Keep it Cold: Kachumbari is meant to be a cold contrast to hot food. Keep it in the fridge until the very last second.
• Add Avocado: If you want a creamier version, dice up a ripe avocado and toss it in right before serving.
❓ FAQ
Q1.How long does it stay fresh?
It’s best eaten the same day. By the second day, the tomatoes release their juices and it can get a bit soggy.
Q2.Is it very spicy?
Not unless you want it to be! You can leave the chili out entirely, or use a mild pepper.
Q3.What do I serve it with?
Everything! Grilled chicken, steak, fish, or even inside a sandwich.
🍱 Summary
Kachumbari is summer in a bowl. It’s bright, healthy, and provides that essential "crunch" that makes a hearty dinner feel light and balanced.
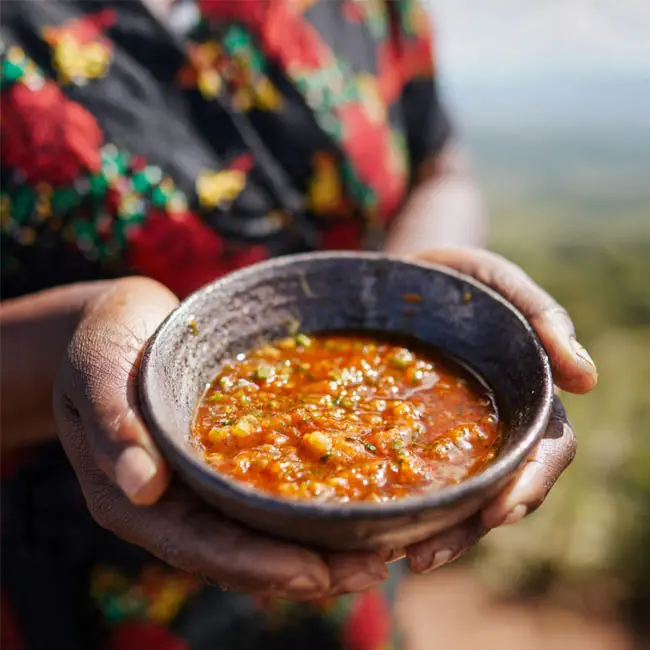
🌶️ Recipe 2: Infused Pili Pili Sauce (The Kenyan Fire)
🇰🇪 🔥 About this Recipe
For the heat-seekers out there, Pili Pili Sauce is a must-have. Unlike many commercial hot sauces that are mostly vinegar, Kenyan Pili Pili focuses on the aromatic marriage of chilies, garlic, and oil. It’s often served as a thick paste or an infused oil. A tiny drop on your meat or stirred into your rice will transform the meal. It’s earthy, bold, and has a heat that builds beautifully without burning your palate out.
📝 Ingredients & Measurements
• 1 cup of Fresh Red Bird’s Eye Chilies (Stems removed)
• 6 cloves of Garlic (Peeled)
• 1 inch of Fresh Ginger (Peeled and sliced)
• 1/2 cup of Vegetable Oil or Avocado Oil
• 1/4 cup of White Vinegar (For preservation and tang)
• 1 teaspoon of Salt
• 1/2 teaspoon of Cumin Powder (For an earthy depth)
👩🍳 Step-by-Step Instructions
1.Blend the Aromatics: Place the chilies, garlic, and ginger into a blender or food processor. Pulse until you have a coarse paste. (Don't breathe in too deep—those peppers are strong!)
2.Heat the Oil: In a small saucepan, heat the oil over medium-low heat.
3.Fry the Paste: Carefully add the chili-garlic paste to the warm oil. Be careful of splashes. Sauté it for about 5–8 minutes. You’ll know it’s ready when the oil turns a bright orange/red and the garlic smells toasted.
4.Season: Stir in the salt and cumin powder.
5.Deglaze: Pour in the vinegar. It will sizzle! Let it simmer for another 2 minutes. The vinegar helps preserve the sauce and adds a necessary "zip."
6.Cool Down: Turn off the heat and let the sauce cool completely in the pan.
7.Bottle it up: Pour the sauce (oil and all) into a clean glass jar.
💡 Tips & Mistakes to Avoid
• Wear Gloves: If you are handling a lot of chilies, your hands will burn for hours if you don't wear gloves. Trust me on this one!
• Don't Burn the Garlic: Keep the heat low. If the garlic turns black, the sauce will be bitter. You want a "gentle sizzle."
• Sterilize Your Jar: Make sure your glass jar is bone-dry and clean so the sauce lasts longer in the fridge.
• The "Wait" Period: Like a good wine, this sauce tastes better after 24 hours in the fridge once the flavors have had time to "get to know each other."
❓ FAQ
Q1.How long does it last?
Because of the oil and vinegar, it can last up to a month in the fridge.
Q2.Can I make it less hot?
You can substitute half of the bird's eye chilies with red bell peppers to dial down the fire.
Q3.Does it have to be red?
You can make a "Green Pili Pili" using green chilies and fresh cilantro for a different, grassier flavor profile.
🍱 Summary
This Pili Pili sauce is the ultimate condiment for anyone who loves a bit of adventure. It’s rich, fragrant, and provides a heat that feels intentional, not just painful.

🍯 Recipe 3: Coastal Ukwaju (Tamarind) Dipping Sauce
🇰🇪 🌊 About this Recipe
If you travel to the Swahili Coast, you’ll find Ukwaju Sauce served with every street snack imaginable. It’s made from the pulp of the tamarind tree. This sauce is a "flavor bomb"—it’s sour, sweet, and savory all at once. It’s traditionally served with Viazi Karai (spiced potatoes) or fried fish. In a summer dinner setting, it’s an incredible glaze for grilled shrimp or a dip for crispy appetizers. It’s exotic, sophisticated, and surprisingly easy to make.
📝 Ingredients & Measurements
• 1/2 cup of Tamarind Paste (Or a block of tamarind pulp)
• 1 cup of Warm Water
• 2 tablespoons of Brown Sugar (To balance the sourness)
• 1 teaspoon of Ground Cumin
• 1/2 teaspoon of Ground Ginger
• 1/2 teaspoon of Salt
• 1 small clove of Garlic (Finely grated)
• A pinch of Chili Flakes (Optional)
👩🍳 Step-by-Step Instructions
1.Extract the Pulp: If using a tamarind block, soak it in the warm water for 20 minutes. Use your fingers to mash it up, then strain the mixture through a sieve to remove the seeds and fibers. If using smooth paste, just whisk it with the water.
2.The Simmer: Pour the tamarind liquid into a small saucepan over medium heat.
3.Sweeten and Spice: Add the brown sugar, cumin, ginger, salt, and grated garlic.
4.Reduce: Let the sauce simmer gently for about 10 minutes. You want it to thicken slightly until it can coat the back of a spoon.
5.Taste Test: Tamarind varies in sourness. If it’s too tart, add another spoonful of sugar. If it’s too sweet, add a squeeze of lime.
6.Cool and Store: Let it cool down. It will thicken even more as it sits.
💡 Tips & Mistakes to Avoid
• Sieve it well: Nothing ruins a good sauce like a stray tamarind seed. Make sure your strained liquid is smooth.
• Balance is Everything: The magic of Ukwaju is the tug-of-war between sour and sweet. Don't be afraid to adjust the sugar!
• Don't Over-Garlic: Since this is a delicate sauce, use a tiny bit of garlic. You don't want it to overpower the fruity tang of the tamarind.
• Use as a Glaze: Try brushing this onto salmon or chicken 5 minutes before they finish grilling. The sugar in the sauce will caramelize beautifully.
❓ FAQ
Q1.Where do I find tamarind?
Most Asian or African grocery stores carry it in blocks or jars of paste.
Q2.Is it similar to BBQ sauce?
It has that "tangy-sweet" vibe but it’s much thinner and more fruit-forward.
Q3.Can I keep it in the pantry?
No, keep it in the fridge. It will stay good for about 2 weeks.
🍱 Summary
Ukwaju sauce is a game-changer for your summer seafood or potato dishes. It’s a taste of the Indian Ocean that brings a unique, "tasty" edge to your dinner table.
🌟 Final Thoughts: Bringing the Boldness Home
There you have it—three incredible sauces that represent the best of Kenyan summer flavors! What I love most about these recipes is that they are so versatile. You can make a batch of Pili Pili on Sunday and use it all week, or whip up a fresh Kachumbari in ten minutes when guests show up unexpectedly.
Kenyan food is all about the joy of the "extra." We don't just eat to get full; we eat to experience textures and tastes that wake up the senses. I really encourage you to try these recipes one by one. Start with the Kachumbari—it’s the easiest way to transform a simple grilled chicken breast into something special. Then, when you’re feeling brave, give the Pili Pili a go!
Cooking is a journey, and adding these sauces to your repertoire is like getting a stamp on your culinary passport. I’d love to hear which one becomes your favorite. Did you love the zing of the tamarind? Or are you now a Pili Pili addict? Let me know!
| 🇰🇪 🥘 < Back |