
🏠 Home > 🗺️ Recipes > 🍞 Breads > 🇰🇪 Kenya Breads > 🍞 1.Soft Layered Kenyan Chapati (The Flaky Legend) , 2.Classic Mandazi (The Fluffy Soup Soaker) , 3.Mkate wa Sinia (The Swahili Coconut Sponge)
🍞 The Ultimate Guide to Cozy Kenyan Breads: Your Winter Soup’s Best Friend
Published by Supakorn | Updated: March 2026
Hey there, fellow foodie! If you’ve been following my recent deep dive into the world of hearty Kenyan soups, you know that a steaming bowl of broth is only half the story. To truly unlock that "soul-warming" feeling on a cold winter evening, you need the perfect companion. In Kenya, we don't just use spoons; we use our bread.
There is something incredibly therapeutic about tearing into a warm, flaky piece of dough and using it to scoop up a rich, aromatic stew. Lately, Kenyan breads have been taking the international culinary world by storm. From trendy cafes in London to home kitchens in New York, people are falling in love with the unique textures and subtle spices of East African bakery. These aren't your standard grocery store loaves; these are breads with personality.
In this cozy guide, I’m bringing the warmth of the Kenyan hearth to your kitchen with 3 Top-Rated Bread Recipes that are specifically chosen for their "dippability":
🍞 • Recipe 1: Soft Layered Chapati: The flaky, buttery king of all flatbreads.
🍞 • Recipe 2: Classic Mandazi: The slightly sweet, pillowy cloud that balances savory soups.
🍞 • Recipe 3: Mkate wa Sinia: The elegant Swahili rice-and-coconut bread that soaks up flavor like a sponge.
I know what you're thinking—"Bread making sounds hard!" But trust me, as your friend in the kitchen, I’ve simplified these so anyone can do them. Grab your apron, and let’s turn that oven (or pan) on!
🥣🍞Introduction: The Magic of the Kenyan "Dipping" Culture 🇰🇪 🌐🌈
Before we jump into the flour and yeast, let's chat about why these breads are such a big deal. In Kenya, bread is the glue of the meal. Whether it’s a simple family dinner or a massive wedding feast, the bread is what brings everyone together.
International foodies are obsessed with these recipes right now because they offer a break from the usual. They use simple, pantry-staple ingredients but achieve textures that are totally different from Western sourdough or baguettes. For example, the way we "coil" our Chapatis creates dozens of layers that trap soup inside, giving you the perfect bite every single time.
This article is designed to be your go-to winter handbook. I’m going to walk you through each recipe with friendly, easy-to-follow steps. We’ll cover the common mistakes (so you don’t have to make them!) and answer the questions that usually pop up. By the time you finish reading, you’ll be ready to host your very own Kenyan-themed soup and bread night. Let’s get rolling!

🍪 Recipe 1: Soft Layered Kenyan Chapati (The Flaky Legend)
🇰🇪 🥨 About this Recipe
If Kenya had a "National Bread," the Chapati would likely be it. While it shares roots with the Indian flatbread of the same name, the Kenyan version is in a league of its own. It’s thicker, richer, and famous for its "layers." A perfect Kenyan Chapati should be soft enough to fold easily but strong enough to hold a heavy scoop of meat or beans. When dipped into a hot soup, the layers separate slightly, allowing the broth to soak into every crevice. It is, quite simply, the ultimate dipping bread.
📝 Ingredients & Measurements
• 3 cups of All-Purpose Flour (Plus extra for dusting)
• 1 and 1/4 cups of Warm Water
• 1 teaspoon of Salt
• 1 teaspoon of Sugar (This helps with the golden-brown color)
• 4 to 5 tablespoons of Vegetable Oil (For the dough and for frying)
• 2 tablespoons of Ghee or Butter (Optional, for extra richness)
👩🍳 Step-by-Step Instructions
1.Mix the Base: In a large bowl, combine the flour, salt, and sugar. Mix well.
2.Hydrate: Make a well in the center and pour in the warm water along with 2 tablespoons of oil. Stir with a wooden spoon until a shaggy dough forms.
3.The Kneading Ritual: Move the dough to a clean surface. Knead it for about 8 to 10 minutes. This is your workout! You want the dough to be very smooth, soft, and slightly stretchy. If it’s too sticky, add a tiny bit of flour.
4.The First Rest: Place the dough back in the bowl, cover it with a damp cloth, and let it rest for at least 30 minutes. This relaxes the gluten, which is the secret to a soft Chapati.
5.Create the Layers: Divide the dough into equal-sized balls (about the size of a lemon). Roll one ball into a thin circle. Brush the top with a little oil.
6.The Coil: Roll the circle up like a cigar, then twist that "cigar" into a spiral (like a snail shell). Tuck the end underneath. Do this for all the balls and let them rest for another 15 minutes.
7.Final Roll: Take your "snail" and roll it out again into a circle (about 7 to 8 inches wide).
8.Pan Frying: Heat a flat pan (tawa) or skillet over medium heat. Place the Chapati on the dry pan. Once tiny bubbles appear, flip it.
9.The Golden Touch: Spread a teaspoon of oil over the top, then flip again. Press down gently with a spatula to ensure even cooking. Repeat until both sides have beautiful golden-brown spots.
10.Keep Warm: Place the finished Chapatis in a container lined with a cloth to keep them soft and warm until serving.
💡 Tips & Mistakes to Avoid
• Warm Water is Key: Using cold water makes the dough tough. Warm water ensures the starch absorbs the moisture properly.
• Don't Rush the Rest: If the dough keeps shrinking back when you roll it, it hasn't rested long enough. Give it another 10 minutes.
• Too Much Flour: Avoid using too much flour when rolling. It can burn in the pan and make your Chapatis dry and dusty.
• Medium Heat only: If the heat is too low, the Chapati dries out before it browns. If too high, it burns on the outside while the inside stays raw.
❓ FAQ
Q1.Can I use Whole Wheat flour?
You can, but the texture will be much denser. A 50/50 mix of white and whole wheat is a good compromise.
Q2.How do I make them stay soft for the next day?
Keep them wrapped tightly in foil or a plastic bag. You can reheat them quickly on a pan to bring back the softness.
Q3.Why aren't my layers showing?
This usually happens if you didn't use enough oil during the "coiling" stage. That oil is what keeps the layers from sticking together!
🍱 Summary
The Soft Layered Chapati is a masterpiece of texture. It transforms a simple meal into an experience. Once you master the "coil," you’ll never go back to plain store-bought wraps again.

🍩 Recipe 2: Classic Mandazi (The Fluffy Soup Soaker)
🇰🇪 🥯 About this Recipe
While many people think of Mandazi as a breakfast snack, in Kenya, we love using it to balance out spicy or savory soups. It’s a deep-fried bread that is soft, airy, and only mildly sweet. Think of it like a savory-leaning doughnut. When you dip a Mandazi into a rich tomato-based soup or a creamy bean stew, the "sponge" of the bread soaks up the liquid, creating a burst of flavor in every bite. It’s the ultimate comfort food for a chilly winter night.
📝 Ingredients & Measurements
• 3 cups of All-Purpose Flour
• 1/2 cup of Warm Milk (Or coconut milk for a tropical twist)
• 1/2 cup of Granulated Sugar
• 1 tablespoon of Baking Powder (Or 2 teaspoons of yeast for a slower rise)
• 1 teaspoon of Ground Cardamom (Essential for that authentic scent!)
• 1 large Egg (Beaten)
• 2 tablespoons of Melted Butter or Oil
• 1/2 teaspoon of Salt
• Vegetable Oil for deep frying
👩🍳 Step-by-Step Instructions
1.Dry Mix: In a large bowl, whisk together the flour, sugar, baking powder, salt, and ground cardamom.
2.Wet Mix: In a separate jug, mix the warm milk, melted butter, and the beaten egg.
3.Combine: Gradually pour the wet ingredients into the dry mixture. Mix until a dough forms.
4.Knead: Knead the dough for about 5 to 7 minutes on a floured surface. You want a smooth dough that isn't too sticky.
5.Rest: Cover the dough and let it rest for at least 30 to 45 minutes. This makes it easier to roll and ensures a better "puff."
6.Shape: Divide the dough into 4 large portions. Roll each portion into a circle about half an inch thick. Cut the circle into 4 triangles (like a pizza).
7.Heat the Oil: Heat about 2 to 3 inches of oil in a deep pan. You want it medium-hot (around 350 degrees Fahrenheit or 180 degrees Celsius).
8.Fry: Carefully drop a few triangles into the oil. They should sink and then pop back up to the surface almost immediately.
9.Flip and Puff: Use a slotted spoon to flip them continuously. This helps them puff up like little pillows. Fry until they are a beautiful dark golden brown.
10.Drain: Remove and place on paper towels. Serve warm alongside your favorite soup.
💡 Tips & Mistakes to Avoid
• The Cardamom Aroma: Don't skip the cardamom! It’s the soul of the Mandazi. If you don't have it, a little cinnamon or ginger can work, but it won't be "authentic."
• Oil Temperature: If the oil is too hot, they will brown on the outside but stay doughy inside. Test with a small scrap of dough first.
• Thickness Matters: If you roll the dough too thin, they will be crunchy like crackers. Keep them about half an inch thick for that "pillow" texture.
• Don't Overcrowd: Frying too many at once drops the oil temperature and makes them greasy.
❓ FAQ
Q1.Can I make them without eggs?
Yes, just add a little more milk or water. The egg just makes them slightly richer and softer.
Q2.Why didn't mine puff up?
This is usually due to the oil temperature being too low or the baking powder being old.
Q3.Are they the same as Mahamri?
Almost! Mahamri is specifically made with coconut milk and yeast, while Mandazi is more general and often uses baking powder.
🍱 Summary
Mandazi is the perfect "all-rounder." It’s satisfyingly chewy, beautifully spiced, and its ability to soak up soup is second to none. Plus, the kids will love them too!
🥥 Recipe 3: Mkate wa Sinia (The Swahili Coconut Sponge)
🇰🇪 🍮 About this Recipe
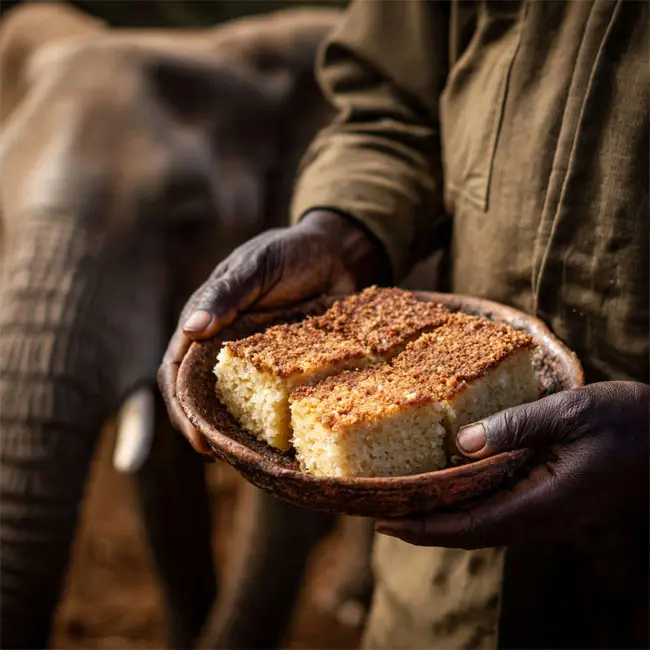
This recipe comes straight from the Swahili coast and is unlike any bread you’ve ever had. Mkate wa Sinia (literally "Tray Bread") is made from rice flour and coconut milk. It has a unique, honeycomb-like texture inside that makes it the world’s best "flavor sponge." If you are serving a creamy coconut-based soup (like Maharagwe ya Nazi), this bread is the perfect match. It’s naturally gluten-free and has a subtle sweetness that complements spicy broths beautifully.
📝 Ingredients & Measurements
• 2 cups of Basmati Rice (Soaked overnight)
• 1 and 1/2 cups of Heavy Coconut Milk
• 3/4 cup of Sugar
• 1 tablespoon of Instant Yeast
• 1 teaspoon of Ground Cardamom
• 1 Egg White (Optional, for a better rise)
• 2 tablespoons of Ghee or Oil (For greasing the pan)
👩🍳 Step-by-Step Instructions
1.Soak and Drain: Soak the rice in plenty of water for at least 8 hours or overnight. Drain the water completely before starting.
2.Blend: Put the drained rice, coconut milk, sugar, yeast, and cardamom into a high-speed blender. Blend until the mixture is completely smooth—no grains of rice should be felt.
3.Ferment: Pour the batter into a large bowl. Cover it and let it sit in a warm place for about 1 to 2 hours. It should become very bubbly and frothy.
4.Add the Egg White: If using, gently whisk the egg white until soft peaks form and fold it into the fermented batter. This makes it extra light.
5.Prep the Pan: Grease a deep baking pan or a heavy skillet with ghee. Pour the batter in.
6.Bake: Traditionally, this is cooked on a stovetop with heat on top and bottom, but an oven works perfectly! Bake at 350°F (180°C) for about 30 to 40 minutes.
7.The Golden Crust: The top should be nicely browned and the edges should start to pull away from the pan.
8.Cool and Slice: Let it cool in the pan for 10 minutes before slicing it into squares or diamonds. Serve warm or at room temperature.
💡 Tips & Mistakes to Avoid
• Smooth Blending: If you don't blend the rice long enough, the bread will feel "gritty." Take your time with the blender!
• Fresh Coconut Milk: Canned coconut milk works fine, but make sure it’s the full-fat version for that rich, Swahili flavor.
• Don't Over-Ferment: If it sits too long, it might develop a sour yeast taste. Watch for when it's doubled and bubbly, then bake.
• Grease the Pan Well: Rice-based breads love to stick! Use a generous amount of ghee or oil.
❓ FAQ
Q1.Can I use Rice Flour instead of soaking rice?
You can, but the texture is much better with soaked rice. If using flour, use about 2.5 cups.
Q2.Is this a dessert or a bread?
It’s both! In Kenya, we eat it with tea, as a dessert, or as a side to savory coconut stews.
Q3.Can I make it vegan?
Absolutely, just skip the egg white and the ghee (use oil instead).
🍱 Summary
Mkate wa Sinia is the "elegant" choice. Its honeycomb texture is a conversation starter, and its ability to absorb creamy soups makes it a winter winner.
🌟 Final Thoughts: A Winter Table Full of Warmth
There you have it, my friend! Three very different, very delicious Kenyan breads that are ready to take your winter soup nights to the next level. Whether you’re peeling back the layers of a buttery Chapati, tearing into a puffy Mandazi, or savoring the coconut richness of Mkate wa Sinia, you’re experiencing a taste of Kenyan culture that is all about warmth and togetherness.
Making bread can feel intimidating at first, but remember—it’s just flour, water, and heart. Don't worry if your first Chapati isn't a perfect circle or if your Mandazi doesn't puff like a balloon. The flavor will still be incredible, and the warmth it brings to your home is what truly matters.
I challenge you to pick one of these recipes this weekend. Pair it with a simple vegetable soup or a hearty bone broth, and watch how it transforms your evening. Once you’ve tried it, please share your experience! Did you love the cardamom scent? Did you manage to get those flaky layers?
Cooking is an adventure, and I’m so glad we’re on this journey together. Stay warm, stay hungry, and most importantly, stay cozy!
| 🇰🇪 🍞 < Back |