
🏠 Home > 🗺️ Recipes > 🍨 Desserts > 🇬🇼 Guinea-Bissau Desserts > 🍨 Raivas (Cinnamon Butter Cookies) , Bolo à Moda da Guiné Bissau (Guinean Style Cake) , Fidjós de Banana (Sweet Fried Plantain Fritters)
🍨 A Sweet West African Finale: 3 Simple Guinea-Bissau Dessert Recipes
Published by Supakorn | Updated: February 2026
Introduction
Hello, my fellow dessert enthusiasts! After a great meal, there’s nothing better than a sweet treat to cap off the experience. If you’re like me, you’re always searching for new, unique flavors beyond the usual chocolate chip cookies or apple pie. Today, we're taking our sweet craving on an exciting journey to the coast of West Africa: Guinea-Bissau!
The dessert scene in Guinea-Bissau is a fascinating blend of tropical abundance and European baking tradition, thanks to its history as a Portuguese colony. You'll find recipes that feature staple ingredients like cassava and plantains, alongside comforting baked goods spiced with cinnamon and citrus. These desserts are hearty, comforting, and generally quite simple to master—perfect for beginners!
While traditional Guinea-Bissau cuisine is mostly known for savory stews like Caldo de Mancarra, their sweets are slowly starting to be discovered by global foodies looking for that perfect, authentic ending to a West African dinner.
In this long-form guide, we’ve rounded up three of the most accessible and delicious Guinea-Bissau desserts for you to try tonight:
- 🔹 Recipe 1: Raivas (Cinnamon Butter Cookies) – A classic, slightly rustic Portuguese-style cookie with a cinnamon kick.
- 🔹 Recipe 2: Bolo à Moda da Guiné Bissau (Guinean Style Cake) – A simple, custardy cake that’s surprisingly light.
- 🔹 Recipe 3: Fidjós de Banana (Sweet Fried Plantain Fritters) – A simple, sweet street-food inspired treat.
Get ready to preheat your ovens (and fryers)!
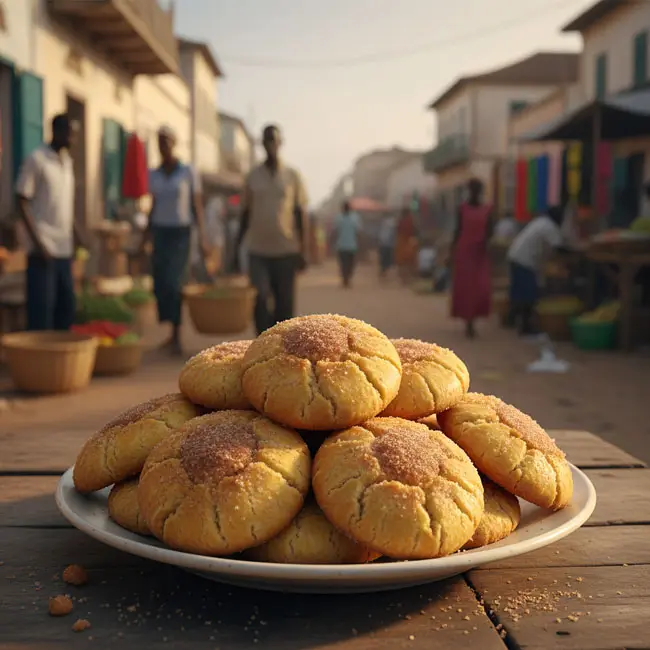
🔹 Recipe 1: Raivas (Cinnamon Butter Cookies)
About this Recipe
Raivas are a beautiful example of the enduring Portuguese culinary legacy in Guinea-Bissau. These are essentially traditional Portuguese butter cookies, but they’ve been fully adopted and embraced into the local food culture. They are often described as a slightly irregular, rustic cookie—their charm lies in their imperfect, squiggly shapes! They are only lightly sweet, allowing the robust flavor of butter and a generous amount of cinnamon to truly shine. Raivas have a pleasant snap on the outside and a slightly softer, almost cakey interior, making them perfect for dunking into coffee or tea.
Ingredients & Measurements (Makes approximately 20-24 cookies)
- 8 tablespoons (1 stick or 113g) unsalted butter, softened
- 1/2 cup (100g) granulated sugar
- 3 large eggs
- 2 cups (240g) all-purpose flour, plus extra for dusting
- 1 tablespoon ground cinnamon
- 1 teaspoon baking powder
- 1/4 teaspoon salt
Step-by-Step Instructions
1.Prep the Dough: In a large bowl or stand mixer, cream the softened butter and sugar together until the mixture is light, pale, and fluffy (about 3-5 minutes).
2.Add Wet Ingredients: Beat in the eggs, one at a time, ensuring each one is fully incorporated before adding the next. Scrape down the sides of the bowl as needed.
3.Combine Dry Ingredients: In a separate bowl, whisk together the flour, ground cinnamon, baking powder, and salt.
4.Mix the Dough: Gradually add the dry ingredients to the wet mixture, mixing on low speed or by hand with a spatula until the dough just comes together. Do not overmix! The dough should be soft but manageable and shouldn't stick excessively to the sides of the bowl.
5.Form the Cookies: Turn the dough out onto a lightly floured surface. Roll the dough into a cylinder and cut it into 20-24 equal pieces. Roll each piece into a thin rope, about 8-10 inches long.
6.Shape and Bake: Twist the ropes into irregular, squiggly, or figure-eight shapes—remember, the more rustic, the better! Place them on a baking sheet lined with parchment paper.
7.Bake: Bake in a preheated oven at 350°F ( 175°C) for 12-15 minutes, or until the edges are lightly golden and the cookies feel firm to the touch. Let cool on a wire rack before serving.
Tips & Mistakes to Avoid
- Tip: Do not overmix the dough once the flour is added. Overmixing develops too much gluten, resulting in tough, chewy cookies instead of light, cakey ones.
- Mistake: If the dough is too sticky to roll, add a very small amount of flour, one tablespoon at a time, until it is workable.
- Tip: For an extra layer of flavor and texture, mix a pinch of lemon zest into the creamed butter and sugar.
- Mistake: Trying to make them look too perfect! The charm of Raivas is their slightly lumpy, irregular shape. Embrace the wibbly-wobbly look!
FAQ
Q: Can I use margarine instead of butter?
A: Butter is best for flavor, but a good quality baking margarine can be substituted. The texture may be slightly different.
Q: Why are they only lightly sweet?
A: Raivas were traditionally made to be dunked in a hot beverage, balancing the sweetness with the drink's bitterness. If you prefer them sweeter, you can dust them with powdered sugar or drizzle with a simple sugar glaze after they cool.
Q: How should I store the leftovers?
A: Keep them in an airtight container at room temperature for up to a week.
Summary
Raivas are a delightful and historic cookie from Guinea-Bissau. They offer a comforting, familiar cinnamon-butter flavor in a fun, rustic package. They are the perfect simple bake that transports you straight to the bustling markets and quiet cafes of Bissau.
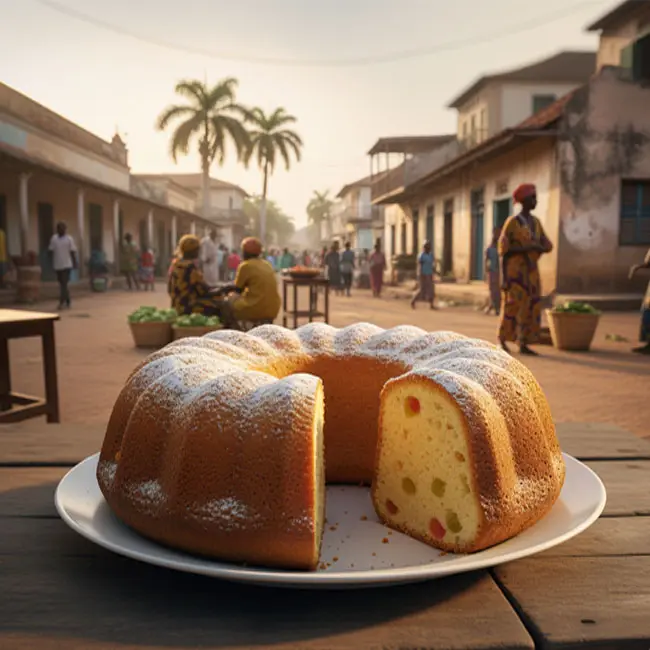
🔹 Recipe 2: Bolo à Moda da Guiné Bissau (Guinean Style Cake)
About this Recipe
Bolo à Moda da Guiné Bissau literally means "Cake in the Style of Guinea-Bissau." While the name is simple, the cake itself is subtly rich and incredibly versatile. It is a dense, almost pound-cake-like dessert that often leans toward the texture of a flan or custard due to the generous amount of eggs it uses. Unlike heavily flavored or complex cakes, the Bolo à Moda is clean and buttery, often served plain or with just a simple brushing of syrup, making it perfect alongside a cup of strong, sweet coffee or green tea (which is also popular in the region). This recipe proves that sometimes, the most basic ingredients yield the most satisfying results.
Ingredients & Measurements (Serves 8-10)
- 1 cup (225g) unsalted butter, softened
- 1 cup (200g) granulated sugar
- 4 large eggs
- 1 cup (120g) all-purpose flour
- 1 tablespoon milk (whole milk is best)
- 1 teaspoon baking powder
- Pinch of salt
- Optional: 1/2 teaspoon vanilla extract or a pinch of lemon zest
Step-by-Step Instructions
1.Preheat and Prep: Preheat your oven to 350°F ( 175°C). Grease and flour an 8 or 9-inch round cake pan.
2.Cream Butter and Sugar: In a large mixing bowl, cream the softened butter and granulated sugar together until they are very light and fluffy. This step is crucial for the cake's final texture.
3.Incorporate Eggs: Add the eggs, one at a time, mixing well after each addition. Be patient here; adding them slowly helps prevent the batter from curdling, which is common with a high ratio of eggs. Add the vanilla or lemon zest now, if using.
4.Mix Dry Ingredients: In a separate medium bowl, whisk together the flour, baking powder, and salt.
5.Combine Batters: Gently add the dry ingredients to the butter/sugar mixture, alternating with the single tablespoon of milk. Start and end with the flour. Mix only until the flour streaks disappear—again, do not overmix. The batter will be relatively fluid.
6.Bake: Pour the batter into the prepared cake pan. Bake for about 30-40 minutes. The cake is done when the top is golden brown and a toothpick inserted into the center comes out clean.
7.Cool and Serve: Let the cake cool in the pan for 10-15 minutes before inverting it onto a wire rack to cool completely. Traditionally, it is served plain, but you can brush it with a warm simple syrup (equal parts sugar and water, boiled) for extra moisture.
Tips & Mistakes to Avoid
- Tip: Ensure all your ingredients, especially the butter and eggs, are at room temperature. This is essential for a smooth batter that doesn't curdle and bakes evenly.
- Mistake: Don't skip the slow addition of eggs. Rushing this step is the main cause of separation in the batter.
- Tip: Because the flavor is simple, use good quality butter, as it provides the majority of the cake's taste.
- Mistake: Opening the oven door too early. A cake with a high egg-to-flour ratio needs stable heat to set. Wait until at least the 25-minute mark before checking.
FAQ
Q: Why does my batter look curdled after adding the eggs?
A: This usually happens if the eggs are too cold or added too quickly. Don't panic! Adding a tablespoon of your pre-measured flour often helps bring the mixture back together.
Q: Can I add any local fruit?
A: Absolutely! You could fold in 1/2 cup of diced cashews (a major Bissau-Guinean export) or finely diced mango before baking.
Q: What kind of pan is best?
A: A metal pan is preferred for even heating, but a glass pan will also work—you may need to reduce the oven temperature by 25°F.
Summary
The Bolo à Moda da Guiné Bissau is a true comfort classic. It’s a testament to the satisfying simplicity of baking, offering a lovely, buttery flavor and a custardy texture that will make you feel like you’re sitting in a small cafe in Bissau.

🔹 Recipe 3: Fidjós de Banana (Sweet Fried Plantain Fritters)
About this Recipe
Fidjós is a general term that refers to fritters, and Fidjós de Banana are essentially delicious, slightly savory-sweet fried plantain balls, often enjoyed as a snack or a simple dessert throughout West Africa, including Guinea-Bissau. Unlike their starchier green plantain cousins, these fritters use ripe yellow or black plantains, which are naturally sweet. The plantain is mashed or blended with a few simple ingredients to form a batter, then fried until golden and puffy. They are wonderfully satisfying—soft and moist on the inside with a delightful golden crust. They are often served simply, but a light dusting of cinnamon or powdered sugar takes them to the next level!
Ingredients & Measurements (Makes 10-12 fritters)
- 2 very ripe plantains (skin should be yellow with large black spots, or entirely black)
- 1/4 cup all-purpose flour
- 1/4 cup granulated sugar (or to taste, depending on plantain ripeness)
- 1/2 teaspoon ground cinnamon
- 1/4 teaspoon salt
- 1/2 teaspoon vanilla extract (optional)
- Vegetable oil, for deep frying (about 2 inches in the pan)
Step-by-Step Instructions
1.Prepare the Plantain: Peel the plantains. In a large bowl, mash them thoroughly with a fork until they are very smooth, with minimal lumps. You can also use a food processor for a quicker, smoother result, but be careful not to over-blend to a liquid state.
2.Make the Batter: Add the flour, sugar, cinnamon, salt, and vanilla extract (if using) to the mashed plantain. Mix everything together until just combined. The batter should be thick and scoopable, almost like a very wet dough.
3.Heat the Oil: Pour about 2 inches of vegetable oil into a deep, heavy-bottomed pot or frying pan. Heat the oil to 350°F / 175°C. If you don't have a thermometer, a small piece of batter dropped in should bubble immediately.
4.Fry the Fritters: Using two spoons, scoop a tablespoon of the batter and drop it gently into the hot oil. Fry in batches, making sure not to overcrowd the pan.
5.Cook and Serve: Fry the fritters for about 3-4 minutes, turning them frequently, until they are golden brown and cooked through. The inside should be soft. Remove with a slotted spoon and drain on a paper towel-lined plate. Serve warm, perhaps dusted with a little extra cinnamon and sugar.
Tips & Mistakes to Avoid
- Tip: The key to this recipe is the ripeness of the plantains. They must be very ripe (mostly black) for maximum natural sweetness and a soft texture.
- Mistake: Do not use green plantains! They are starchy and require boiling, which is a different recipe entirely.
- Tip: Control the size. Keep the fritters small—about a tablespoon each—to ensure they cook evenly all the way through before the outside burns.
- Mistake: Frying the oil at too high a temperature. If the oil is too hot, the outside will burn before the center has a chance to cook. Keep it around 350°F / 175°C.
FAQ
Q: Can I bake or air-fry these instead of deep-frying?
A: While you can, they won't achieve the traditional Fidjós texture. If you must avoid deep-frying, air-fry at 375°F / 190°C after lightly coating the balls in oil for about 8-10 minutes, flipping halfway.
Q: Is the sugar necessary?
A: If your plantains are completely black and very sweet, you can reduce or even eliminate the added sugar. Taste the mashed plantain first!
Q: What is the difference between this and a banana fritter?
A: Plantains have more starch and hold their shape better during frying, resulting in a heartier fritter with a slightly less intense, sweeter banana flavor.
Summary
Fidjós de Banana is a simple, delightful treat. It takes advantage of the natural sweetness of ripe plantains to create a comforting, fried dessert that is perfect as a late-afternoon snack or a light, satisfying sweet ending to your West African meal.
Final Thoughts
You’ve successfully journeyed through the sweet side of Guinea-Bissau! From the simple, cinnamon-scented snap of the Raivas to the comforting, custardy slice of Bolo à Moda, and finally, the delicious, quick-fried goodness of Fidjós de Banana, you now have three fantastic, beginner-friendly recipes in your arsenal.
What's great about these dishes is how approachable they are. They use basic ingredients and straightforward techniques, proving that world-class flavor doesn't have to mean complicated cooking. They are a wonderful way to introduce your friends and family to the unique blend of African and Portuguese culinary history.
Now for the fun part: I encourage you to pick one (or all three!) and get baking. Start with the one that appeals most to your taste buds. Did the Raivas remind you of a family cookie recipe? Did the Bolo surprise you with its light texture?
Head down to the comments and share your results! Tell us which Bolo you made, what shape your Raivas took, or how you served your Fidjós. Let's share our sweet success and keep this global kitchen growing!
| 🇬🇼 🍨 < Back |