
🏠 Home > 🗺️ Recipes > 🍞 Breads > 🇰🇲 Comoros Breads > 🍞 1.M’tsatsa (The famous flaky layered flatbread) , 2.Comorian Coconut Pan-Bread (The creamy, fragrant staple) , 3.Sweet Cardamom Griddle Cakes (The perfect breakfast bread)
🍞 Quick & Flaky: Authentic Comorian Flatbreads You Can Make in One Pan
Published by Supakorn | Updated: March 2026
🥖 🇰🇲 Introduction: The Warm Aroma of the Perfume Islands🌊⛰️
Hey there, bread lovers! Is there anything in the world better than the smell of fresh bread wafting through the house? I don’t think so. But let’s be honest: traditional bread making—with all the kneading, rising, and multiple floury bowls—can be a total nightmare to clean up. That’s exactly why we’re diving into the wonderful world of Comorian breads today.
The Comoros islands have a unique baking culture that relies heavily on the "One-Pan" method. Because these are volcanic islands where outdoor grilling and stovetop cooking are legendary, they’ve perfected the art of making delicious, fluffy, and flaky breads using just a single skillet or griddle. No massive ovens or specialized equipment required!
Internationally, these breads are becoming a sensation because they are incredibly versatile. You can pair them with savory stews, dip them in coconut sauces, or just eat them plain with a bit of local honey. In this guide, I’m going to show you how to make the three most iconic Comorian breads with minimal effort and, most importantly, minimal cleanup.
We are going to master:
🍳 • Recipe 1: M’tsatsa (The famous flaky layered flatbread)
🍳 • Recipe 2: Comorian Coconut Pan-Bread (The creamy, fragrant staple)
🍳 • Recipe 3: Sweet Cardamom Griddle Cakes (The perfect breakfast bread)
Grab your favorite non-stick pan, and let’s get into the dough!
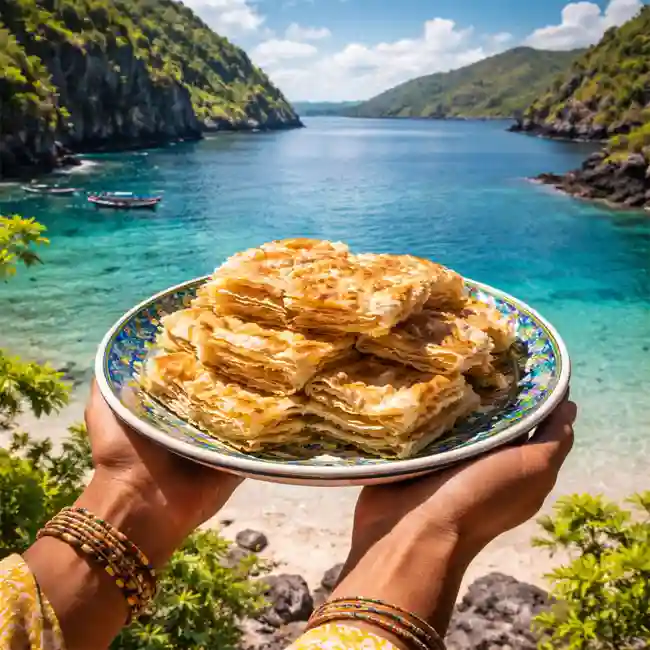
🥐 Recipe 1: Traditional M’tsatsa (Layered Flaky Flatbread)
💡 About this Recipe
If you’ve ever had an Indian Paratha or an African Chapati, you’ll find M’tsatsa familiar, but with a unique Comorian twist. It’s all about the layers! By folding the dough with a bit of oil or clarified butter, you create "pockets" of air that make the bread incredibly light and crispy on the outside. It’s the ultimate "mop" for any sauce-heavy dish.
📝 Ingredients & Measurements
• 3 cups all-purpose flour
• 1 cup warm water (add more sparingly if needed)
• 1 teaspoon salt
• 4 tablespoons vegetable oil or melted ghee (for the layers)
• 1 tablespoon oil (for the pan)
👩🍳 Step-by-Step Instructions
1.The Dough: In a large bowl (our only mixing dish!), combine the flour and salt. Slowly pour in the warm water while stirring with your hand or a spoon until a dough forms.
2.The Knead: Knead the dough right in the bowl for about 5 minutes until it’s smooth and elastic. Cover it with a damp cloth and let it rest for 15 minutes. Resting is key for flakiness!
3.The Coil: Divide the dough into 6 equal balls. Roll one ball out into a thin circle. Brush the surface with a thin layer of oil.
4.Create Layers: Roll the circle up like a cigar, then twist that "cigar" into a spiral shape (like a snail shell). Tuck the end underneath. Repeat for all balls.
5.Flatten: Take your "snails" and roll them out again into flat circles. This process creates dozens of internal layers.
6.Pan Fry: Heat your skillet over medium heat with a tiny drop of oil. Place the M’tsatsa in the pan.
7.The Bubble: Cook for 2–3 minutes until bubbles appear on the surface and the bottom is golden brown. Flip and cook the other side for another 2 minutes.
8.The Scrunch: Once removed from the pan, give the bread a gentle "scrunch" with your hands to separate those beautiful layers.
⚠️ Tips & Mistakes to Avoid
• Don't skip the rest: If the dough is too "springy" and hard to roll out, it needs to rest longer. Let the gluten relax!
• Oil is your friend: If you don't use enough oil during the "coil" phase, the layers will stick together and the bread will be dense instead of flaky.
• Keep the pan hot: If the pan is too cold, the bread will absorb the oil and become greasy. You want that sizzle when it hits the pan!
• Thin is in: Try to roll the dough as thin as possible before the first oiling to get maximum layers.
❓ FAQ
Q1.Can I use whole wheat flour?
You can, but the bread will be much denser. I recommend a 50/50 mix for the best texture.
Q2.How do I store M’tsatsa?
Keep them in a sealed container or wrap them in a clean kitchen towel to keep them soft. They reheat perfectly in a pan for 30 seconds.
Q3.Can I make the dough ahead of time?
Yes! You can keep the "snail" coils in the fridge overnight and roll them out fresh in the morning.
📌 Summary
M’tsatsa is the king of Comorian breads. It’s fun to make, satisfying to pull apart, and requires only a bowl and a pan. It’s the perfect introduction to island baking.
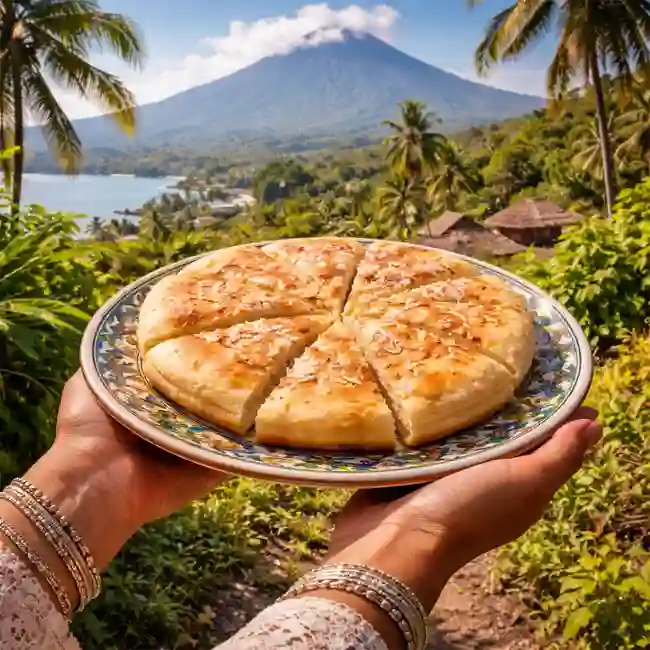
🥥 Recipe 2: Comorian Coconut Pan-Bread
💡 About this Recipe
In the Comoros, if you aren't using coconut, are you even cooking? This coconut pan-bread is a thick, soft, and aromatic bread that uses coconut milk instead of water. It has a slightly sweet undertone that pairs beautifully with spicy curries or just a simple spread of jam. It’s a "no-knead" style that is extremely forgiving for beginners.
📝 Ingredients & Measurements
• 2 cups all-purpose flour
• 1 cup thick coconut milk (warm)
• 1 tablespoon granulated sugar
• 1 teaspoon instant dry yeast
• 1/2 teaspoon salt
• 1/2 cup shredded coconut (optional, for texture)
• 1 tablespoon coconut oil (for the pan)
👩🍳 Step-by-Step Instructions
1.Activate: In your pan (off the heat) or a small bowl, mix the warm coconut milk, sugar, and yeast. Let it sit for 5 minutes until it looks foamy.
2.Mix: Add the flour, salt, and shredded coconut to the liquid. Stir until a sticky, shaggy dough forms.
3.First Rise: Cover the bowl/pan and let the dough rise in a warm spot for about 45 minutes to an hour, or until it has doubled in size.
4.Punch Down: Gently deflate the dough.
5.Shape: Grease your large skillet with coconut oil. Press the dough into the skillet so it covers the entire bottom, like a thick pizza.
6.Second Rise: Cover and let it rise for another 20 minutes right in the pan.
7.Cook Low and Slow: Place the pan on the stove over the lowest heat setting. Cover with a lid. This "steams" the bread while the bottom browns.
8.The Flip: After about 10–12 minutes, the top should look set and dry. Carefully flip the bread over and cook the other side for 5 minutes without the lid.
⚠️ Tips & Mistakes to Avoid
• Temperature Matters: Make sure the coconut milk is warm, not hot. If it's too hot, it will kill the yeast.
• The Lid is Essential: Cooking the first side with a lid on is what makes the center fluffy and cooked through without burning the bottom.
• Don't rush the rise: If the dough hasn't doubled in size, the bread will be heavy and gummy. Give it time!
• Non-stick is best: Since this is a sticky dough, a good non-stick pan makes the flipping process much easier.
❓ FAQ
Q1.Can I use canned coconut milk?
Yes, full-fat canned coconut milk is actually the best choice for this recipe.
Q2.Is this bread vegan?
Yes! It’s naturally plant-based and delicious.
Q3.What if I don't have yeast?
You can use 2 teaspoons of baking powder instead, but you won't get that specific "yeasty" bread flavor and the texture will be more like a giant scone.
📌 Summary
This Coconut Pan-Bread is the ultimate "set it and forget it" bread. It’s thick, fluffy, and carries the true soul of the Comoros in every bite.
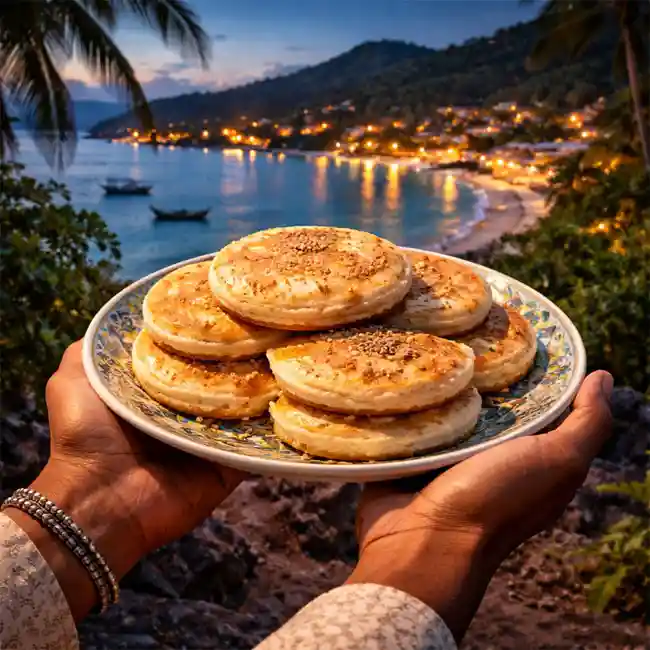
🥯 Recipe 3: Sweet Cardamom Griddle Cakes (Amoudou)
💡 About this Recipe
Known locally as a treat for special mornings, these small griddle cakes (Amoudou) are like a cross between a pancake and a biscuit. They are infused with cardamom, the signature spice of the Indian Ocean trade routes. They are small, portable, and a massive hit with kids. Best of all, they cook in minutes on a dry or lightly greased pan.
📝 Ingredients & Measurements
• 2 cups all-purpose flour
• 1/2 cup sugar
• 1 teaspoon ground cardamom
• 1 tablespoon baking powder
• 1/2 cup coconut cream or heavy cream
• 1 egg
• 1 teaspoon vanilla extract
• 1/4 cup butter (melted)
👩🍳 Step-by-Step Instructions
1.Dry Mix: In a large bowl, whisk together the flour, sugar, cardamom, and baking powder.
2.Wet Mix: Create a well in the center and add the coconut cream, egg, vanilla, and melted butter.
3.Combine: Stir until a soft, slightly sticky dough forms. Do not overmix! You want it just combined so the cakes stay tender.
4.Shape: Dust your hands with a little flour. Take small pieces of dough (about the size of a golf ball) and flatten them into small discs, about 1/2 inch thick.
5.Heat the Pan: Get your skillet to a medium-low heat. You don't need much oil, just a light wipe of butter or oil.
6.Griddle: Place 3–4 cakes in the pan at a time. Cook for about 4 minutes on the first side. You’ll see the edges start to look golden.
7.Flip: Flip them over and cook for another 3 minutes. They should puff up beautifully.
8.Cooling: Let them cool on a rack for a few minutes. They are best served warm with a cup of tea or coffee.
⚠️ Tips & Mistakes to Avoid
• Watch the sugar: Because these have a higher sugar content, they can burn easily. Keep the heat on medium-low!
• Fresh Cardamom: If you can, grind your own cardamom seeds for a much more intense and authentic flavor.
• Avoid overworking: The more you mix the dough, the tougher the cakes will be. Mix just until the flour disappears.
• Size consistency: Try to make all the cakes the same size so they finish cooking at the same time.
❓ FAQ
Q1.Can I add raisins?
Yes! Adding a handful of raisins or dried currants is a common variation.
Q2.Are these like pancakes?
They are much thicker and "bread-ier" than American pancakes. You can hold them in your hand easily.
Q3.Can I use a different spice?
Cinnamon or nutmeg are great substitutes if you don't like cardamom, but cardamom is the "authentic" choice.
📌 Summary
Amoudou are the perfect sweet finish to a Comorian meal or a quick breakfast on the go. They are mess-free, delicious, and provide that wonderful spicy-sweet balance that island cuisine is famous for.
✨ Final Thoughts: Fresh Bread, Happy Kitchen
We’ve just journeyed through the Comoros using nothing but a single pan and a few simple ingredients. From the flaky, buttery layers of the M’tsatsa to the tropical aroma of the Coconut Pan-Bread and the sweet warmth of the Cardamom Griddle Cakes, these recipes show that you don't need a bakery to enjoy professional-quality bread.
The beauty of "One-Pan" cooking is that it removes the barrier between you and a great meal. You don't have to worry about a massive cleanup, which means you can focus on the fun part—the baking and the eating!
I’d love to know which one of these you’re going to try first. Are you a fan of the flaky layers, or do you have a sweet tooth for those cardamom cakes? Try them out, let me know how they turned out, and don't forget to share your "One-Pan" success stories with your friends.
Happy baking, and enjoy every warm, fresh bite!